STOP: Each chapter of Programming for Lovers comprises two parts. First, the “core text” presents critical concepts at a high level, avoiding language-specific details. The core text is followed by “code alongs,” where you will apply what you have learned while learning the specifics of the language syntax. We strongly suggest starting with this chapter’s core text (click the button below) to grasp the fundamentals before moving onto code alongs to see the application of these fundamentals. Once you have done so, you are ready to proceed with this code along!
Learning objectives
In this code along, we will prepare to implement cellular automata, which are represented as two-dimensional arrays. To do so, we will learn how to extend Go’s array and slice syntax to implement two- and multi-dimensional arrays. After learning some multi-dimensional array basics, we will then write a function to print out a Game of Life board.
Setup
Create a folder called twoDArrays in your go/src directory and create a text file called main.go in the go/src/twoDArrays folder. We will edit main.go, which should have the following starter code.
package main

import (
    "fmt"
)

func main() {
    fmt.Println("Two-dimensional arrays (and slices).")
}
Code along summary
Working with two-dimensional arrays
Recall that in Go, one-dimensional “arrays” must have constant size, which applies to higher-dimensional arrays as well. When we declare a two-dimensional array, we must indicate two parameters indicating the number of rows followed by the number of columns.
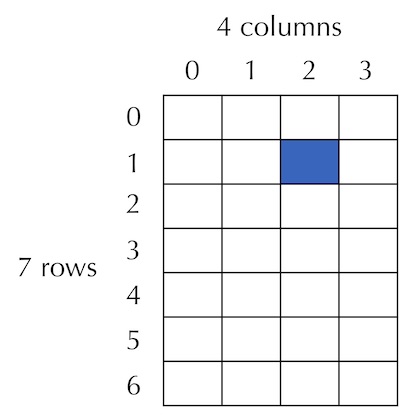
For example, consider the array in the figure below, reproduced from the core text, which has 7 rows and 4 columns.
The following code declares a 7 x 4 array called a, which is created with all default values integer equal to 0.
func main() {
	var a [7][4]int
}
An alternative way of declaring this array is shown below; it conceptualizes the array as an array of length 7, where each element of this array is itself an array of length 4.
func main() {
	var a [7]([4]int)
}
Once we have set the array, we can set some values, as shown below. The row indices of a will range between 0 and 6, and the column indices of a will range between 0 and 3. The element of a at row index r and column index c is denoted a[r][c]; for example, the highlighted cell in the figure above is denoted a[1][2].
func main() {
	var a [7][4]int

	a[1][2] = 19
	a[0][0] = 42
	a[6][3] = 100
}
After these updates, the array has the values as illustrated in the table below.
| 42 | 0 | 0 | 0 |
| 0 | 0 | 19 | 0 |
| 0 | 0 | 0 | 0 |
| 0 | 0 | 0 | 0 |
| 0 | 0 | 0 | 0 |
| 0 | 0 | 0 | 0 |
| 0 | 0 | 0 | 100 |
a after updating the values a[0][0], a[1][2], and a[6][3].We can print the array and see these values by using a print statement.
func main() {
	var a [7][4]int

	a[1][2] = 19
	a[0][0] = 42
	a[6][3] = 100

	fmt.Println(a)
}
After saving main.go, navigate into go/src/twoDArrays from the command line, compile your code by executing the command go build, and run your code by executing either ./twoDArrays (Mac) or twoDArrays.exe (Windows). The following will be printed, which uses brackets to show all the rows of the array. (We will discuss a prettier way of printing arrays soon.)
[[42 0 0 0] [0 0 19 0] [0 0 0 0] [0 0 0 0] [0 0 0 0] [0 0 0 0] [0 0 0 100]]
Array rows and columns
We can isolate the row of a with index r using the notation a[r]. For example, we can print the second row of our array, a[1], as follows.
func main() {
	var a [7][4]int

	a[1][2] = 19
	a[0][0] = 42
	a[6][3] = 100

	fmt.Println(a)

	fmt.Println(a[1])
}
When a is a one-dimensional array, len(a) gives the number of elements in a. When a is a two-dimensional array, len(a) gives the number of rows in a. Because a is rectangular, we can access the number of its columns by accessing the length of any row.
func main() {
	var a [7][4]int

	// ...

    fmt.Println("Number of rows:", len(a)) // prints 7
    fmt.Println("Number of columns:", len(a[0])) // prints 4
}
Declaring two-dimensional slices
Two-dimensional arrays suffer from the same issues as one-dimensional slices. If we want to give a variable as the number of rows or columns, or we want to change the number of elements, then we will need to use a two-dimensional slice.
Let’s see how this works in practice by declaring a two-dimensional slice of boolean variables that might represent a Game of Life board, which we will call board. First, we declare board to have the appropriate type.
func main() {
	// ...

	var board [][]bool
}
As with one-dimensional slices, two-dimensional slices must be “made” to have the appropriate length. When we make a one-dimensional slice, we indicate the number of elements in the slice; when we make a two-dimensional slice, we indicate the number of rows in the slice. Below, we make board have four rows.
func main() {
	// ...

	var board [][]bool
	numRows := 4
	board = make([][]bool, numRows)
}
Once again, this notation is made clearer by conceptualizing a two-dimensional slice of boolean variables as a one-dimensional slice, whose elements are all one-dimensional slices of boolean variables. By replacing [][]bool with []([]bool), Go allows us this conceptualization if we like — although we will typically not use it in practice.
func main() {
	// ...

	var board [][]bool
	numRows := 4
	board = make([]([]bool), numRows)
}
As with one-dimensional slices, we can shorten the creation of board into a single line declaration.
func main() {
	// ...

	numRows := 4
	board := make([][]bool, numRows)
}
Now that we have made our slice, let’s access a value, say board[2][0].
func main() {
	// ...

	numRows := 4
	board := make([][]bool, numRows)

	fmt.Println(board[2][0])
}
Compile and run your code. You will find that we receive a runtime error: index out of range [0] with length 0. We can understand why this is the case if we print the entire slice; when we compile and run the following code, it prints [[] [] [] []]. We have created a slice of length 4, but each element of this slice is an empty slice of boolean variables; in other words, every row of the slice has length equal to zero.
func main() {
	// ...

	numRows := 4
	board := make([][]bool, numRows)

	fmt.Println(board)
}
Instead, we need to range over the rows of board and “make” each row to have the appropriate length. One thing that is nice about slices is that we are not required for every row to have the same number of elements. For example, the following code will set the number of elements in each row to be equal to the row index, all with the default false values.
func main() {
	// ...

	numRows := 4
	board := make([][]bool, numRows)

	// make all the rows of board
	for row := range board {
		board[row] = make([]bool, row)
	}

	fmt.Println(board)
}
Now when we compile and run our code, we see that [[] [false] [false false] [false false false]] is printed. We have created a “non-rectangular” slice (in fact, a triangular slice) that has zero, one, two, and three elements in its four rows, as illustrated below.
| (empty) | ||
false | ||
false | false | |
false | false | false |
Appending to a two-dimensional slice
Because the first row of board is empty, let’s add a false element to the first row. To maintain our triangular shape, let’s also add a false element to each of the other rows.
Recall that in Go, if we have a slice list, then we can append an additional element item to it using the notation list = append(list, item). In this case, we are appending a false value to each row of board (a one-dimensional boolean slice). We can therefore range over each row board[row] and append false to it.
func main() {
	// ...

	numRows := 4
	board := make([][]bool, numRows)

	// make all the rows of board
	for row := range board {
		board[row] = make([]bool, row)
	}

	// appending false to the end of each row
	for row := range board {
		board[row] = append(board[row], false)
	}

	fmt.Println(board)
}
When we compile and run our code, we see that board has the values as shown in the figure below.
false | |||
false | false | ||
false | false | false | |
false | false | false | false |
Let’s now add an entire row of length 5 to board, preserving the triangular shape. Because board can be thought of as a one-dimensional slice whose type is one-dimensional slices of boolean variables, we just need to append one more slice of length 5 to board.
func main() {
	// ...

	numRows := 4
	board := make([][]bool, numRows)

	// make all the rows of board
	for row := range board {
		board[row] = make([]bool, row)
	}

	// appending false to the end of each row
	for row := range board {
		board[row] = append(board[row], false)
	}

	// append a new row to the board
	newRow := make([]bool, 5)
	board = append(board, newRow)

	fmt.Println(board)
}
When we compile and run our code once more, we see that we have added the slice of five false values as shown below.
false | ||||
false | false | |||
false | false | false | ||
false | false | false | false | |
false | false | false | false | false |
Slices as function inputs
Consider the following function that takes as input a two-dimensional boolean slice and sets its top left element to true, without returning the slice.
// SetFirstElementToTrue takes as input a two-dimensional slice of boolean variables.
// It sets the top left element equal to true.
func SetFirstElementToTrue(board [][]bool) {
	if len(board) == 0 || len(board[0]) == 0 {
		panic("no")
	}
	board[0][0] = true
}
In func main(), let’s pass in our triangular board to this function and then print the resulting slice.
STOP: What do you think will be printed?
func main() {
	// ...

	SetFirstElementToTrue(board)

	fmt.Println(board)
}
You may recall from our introduction to slices that unlike arrays and most other basic built-in types that we have worked with, which are pass-by-value, slices are pass-by-reference. When we pass board into SetFirstElement(), any changes that we make to board inside of the function will be visible outside of the function as well. As a result, when we print board after passing it into this function, we will see that its top left element has changed to true, as shown below.
true | ||||
false | false | |||
false | false | false | ||
false | false | false | false | |
false | false | false | false | false |
Printing a slice using a function
We now know everything that we need to know about two-dimensional slices in order to implement cellular automata in the coming code alongs. Before we continue, however, let’s practice what we have learned to print a two-dimensional slice in a nicer form.
In the core text, we saw that one way of printing a two-dimensional slice would use a nested for loop. At the level of pseudocode, this function, which we call PrintBoard(), looked like the following.
PrintBoard(board)
    for every integer r from 0 to CountRows(board) - 1
        for every integer c from 0 to CountCols(board) - 1
            Print(board[r][c])
        Print(new line)
We could implement this function in Go as follows. When we range over a two-dimensional slice board, we range over its rows. For a given row board[r], we can then range over this row to obtain all the values in this row. This idea can be implemented in the following function.
// PrintBoard takes as input a two-dimensional slice of booleans representing a GameBoard.
// It returns nothing but it prints the GameBoard to the console,
// printing a black square if the cell is true (alive)
// and printing a white square if the cell is false (dead).
func PrintBoard(board [][]bool) {
	for r := range board {
		for c := range board[r] {
			fmt.Print(board[r][c])
		}
		fmt.Println() // don't forget to print a new line
	}
}
We also saw that this approach is not the most intuitive, since we need to make sure to remember to print a new line, and since nested for loops can be tricky to parse.
Instead, we planned our code in a very modular fashion, as shown below. After ranging over the rows, we pass the work of printing the current row to a subroutine PrintRow(). In this function, we range over the elements of the row, printing each one with another subroutine PrintCell(), and then printing a new line. As for PrintCell(), it just checks whether the current cell is true or false and prints a differently-colored square accordingly.
PrintBoard(board)
    for every integer r from 0 to CountRows(board) - 1
        PrintRow(board[r])

PrintRow(row)
    for every integer c from 0 to len(row) - 1
        PrintCell(row[c])
    Print(new line)

PrintCell(value)
    if value = true
        Print("⬛")
    else
        Print("⬜")
We implement these functions in Go below, starting with PrintBoard().
// PrintBoard takes as input a two-dimensional slice of booleans representing a GameBoard.
// It returns nothing but it prints the GameBoard to the console, one line at a time.
func PrintBoard(board [][]bool) {
	for r := range board {
		PrintRow(board[r])
	}
}
Next, we implement PrintRow().
// PrintRow takes a slice of boolean variables as input.
// It prints all of the cells in this slice one at a time,
// then prints a new line.
func PrintRow(row []bool) {
	for _, val := range row {
		PrintCell(val)
	}
	fmt.Println()
}
We could print white and black squares to represent alive and dead cells, but let’s instead print your two favorite emojis. I will use 😍 to represent an alive cell and 💀 to represent a dead one.
// PrintCell takes a boolean value as input.
// It prints 😍 if the value is true (alive), and 💀 if it is false (dead).
func PrintCell(value bool) {
	if value {
		fmt.Print("😍")
	} else {
		fmt.Print("💀")
	}
}
Defining and printing an example Game of Life board
The R pentomino is shown below on the left, along with the table corresponding to this pattern on the right.
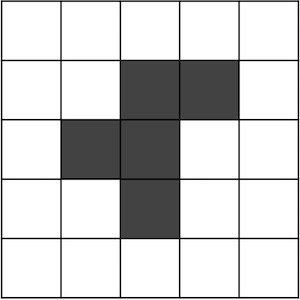
false | false | false | false | false |
false | false | true | true | false |
false | true | true | false | false |
false | false | true | false | false |
false | false | false | false | |
true and dead corresponds to false.Let’s practice our work with two-dimensional slices by declaring the R pentomino, setting its value, and then calling PrintBoard() on it.
func main() {
	// ...

	rPentomino := make([][]bool, 5)
        for row := range rPentomino {
                rPentomino[row] = make([]bool, 5)
        }

	rPentomino[1][2] = true
	rPentomino[1][3] = true
	rPentomino[2][1] = true
	rPentomino[2][2] = true
	rPentomino[3][2] = true

        PrintBoard(rPentomino)
}
When we compile and run our code, we see the following printed to the console.

We now have a nicer picture of the R pentomino, but we would like to make a drawing that allows us to animate the Game of Life over multiple generations. This will be our focus in the next code along, where we talk about built-in packages for drawing and prepare ourselves to implement the Game of Life.