Learning objectives
In this code along, we will apply what we learned in the core text about how to implement an arbitrary cellular automaton, solving the central problem of this chapter, reproduced below.
Cellular Automaton Problem
Input: An initial configuration of a cellular automaton initialBoard, an integer numGens, and a collection of rules rules for the automaton.
Output: All numGens + 1 configurations of the automaton over numGens generations starting with initialBoard and following the rules indicated in rules.
We will then visualize our result by generating an animation of two different automata: the Game of Life automaton that we built in the previous code along, and the magnificent self-replicating automaton called Langton’s loops.
Along the way, we will see that with effective top-down design, we can generalize code that was written for a specific application, the Game of Life, into a powerful program that will be able to generate any one of the infinitude of possible cellular automata.
Code along summary
Setup
To complete this code along, you will need starter code, which can be downloaded here as a file cellularAutomata.zip. Expand this file into a folder cellularAutomata, and move this directory into your go/src source code folder.
You will also need to make sure that you have code for drawing and visualizing animated GIFs (draw2d, canvas, and gifhelper folders) whose installations were part of our previous code alongs on graphics and implementing the Game of Life.
Some functions that will be covered below are already included as part of the starter code because, as we will see, they are identical to their analogues from our work with the Game of Life.
The directory structure of the starter code is similar to gameOfLife (the rules folder is new) and is described below.
boards: a directory containing.csvfiles that represent different initial automaton states.rules: a directory containing.txtfiles that contain rule sets of automata.output: an initially empty directory that will contain images and GIFs that we draw.datatypes.go: a file containing type declarations.functions.go: a file that will contain functions that we will write for implementing automata.io.go: a file that will contain code for reading in an automaton and rules from file.drawing.go: a file that will contain code for drawing an automaton to a file.main.go: a file that will containfunc main(), where we will call functions to read in automata and then draw them.
Declaring a GameBoard type
When implementing the Game of Life, we declared a new type GameBoard that is equivalent to a two-dimensional slice of boolean variables. When representing an arbitrary automaton, we may have more than two states, and so using just true or false values to represent the state of a cell will not suffice, and we will instead represent states using integers. In datatypes.go, we will declare a generalized type GameBoard that is equivalent to a two-dimensional slice of integers.
// GameBoard is a two-dimensional slice of integer variables
// representing a single generation of a Game of Life board.
type GameBoard [][]int
Our highest level function to simulate a cellular automaton
We first will focus on the engine of implementing automata in functions.go, and we begin with our highest level function, PlayAutomaton(). This function takes as input an initial GameBoard object board as well as an integer numGens representing the number of generations, a string neighborhoodType that will be equal to "Moore" or "vonNeumann", and a map of strings to integers rules that representing the rules of the automaton.
We are providing PlayGameOfLife()PlayAutomaton(). Because we have a well-planned top-down design, the differences between implementing the Game of Life and an arbitrary automaton will only appear in the lower levels of the function hierarchy.
// PlayGameOfLife takes as input an initial game board and a number of generations.
// It returns a slice of game boards of length numGens+1 corresponding to playing
// the Game of Life over numGens generations, starting with the initial board.
func PlayGameOfLife(initialBoard GameBoard, numGens int) []GameBoard {
        boards := make([]GameBoard, numGens+1)
        boards[0] = initialBoard
        for i := 1; i <= numGens; i++ {
                boards[i] = UpdateBoard(boards[i-1])
        }
        return boards
}
// PlayAutomaton takes as input a GameBoard, an integer numGens,
// a neighborhood type as a string, and a map of strings to integers representing rules.
// It returns a slice of game boards of length numGens+1 corresponding to simulating the automaton
// specified by the rules over numGens generations, starting with the initial board.
func PlayAutomaton(initialBoard GameBoard, numGens int, neighborhoodType string, rules map[string]int) []GameBoard {
	boards := make([]GameBoard, numGens+1)
	boards[0] = initialBoard

	for i := 1; i <= numGens; i++ {
		boards[i] = UpdateBoard(boards[i-1], neighborhoodType, rules)
	}

	return boards
}
Updating a single generation of a board
Next, we turn to updating a GameBoard over a single generation. We reproduce the pseudocode for UpdateBoard() below, which shows that we will pass the hard work to a function UpdateCell() that updates the state of a single cell of the current board, using neighborhoodType and rules.
UpdateBoard(currentBoard, neighborhoodType, rules)
    numRows ← CountRows(currentBoard)
    numCols ← CountColumns(currentBoard)
    newBoard ← InitializeBoard(numRows, numCols)
    for every integer r between 0 and numRows – 1
        for every integer c between 0 and numCols – 1
            newBoard[r][c] ← UpdateCell(currentBoard, r, c, neighborhoodType, rules)
    return newBoard
Now that you are becoming an expert at working with two-dimensional arrays, the conversion of this pseudocode to Go below should start feeling comfortable.
// UpdateBoard takes as input a GameBoard, a neighborhood type, and a rule map.
// It returns the board resulting from simulating the automaton for one generation according by the rules and neighborhood type.
func UpdateBoard(currBoard GameBoard, neighborhoodType string, rules map[string]int) GameBoard {
	// first, create new board corresponding to the next generation. All cells will have state 0.
	numRows := CountRows(currBoard)
	numCols := CountColumns(currBoard)
	newBoard := InitializeBoard(numRows, numCols)

	//range through all cells of currBoard and update each one into newBoard.
	for r := range currBoard {
		// range over values in currBoard[r]
		for c := 0; c < numCols; c++ {
			//curr value is currBoard[r][c]
			newBoard[r][c] = UpdateCell(currBoard, r, c, neighborhoodType, rules)
		}
	}

	return newBoard
}
Helper functions
UpdateBoard() includes four subroutines: CountRows(), CountColumns(), InitializeBoard(), and UpdateCell(). The first three of these are almost identical to their counterparts when we implemented the Game of Life. We therefore provide them in addition to the AssertRectangular() subroutine as part of the starter code, reproduced below.
// InitializeBoard takes as input a number of rows and a number of columns.
// It returns a numRows x numCols GameBoard object with all values equal to zero.
func InitializeBoard(numRows, numCols int) GameBoard {
	b := make(GameBoard, numRows)
	for i := range b {
		b[i] = make([]int, numCols)
	}

	return b
}

// CountRows takes as input a GameBoard and returns the number of rows
// in the board, assuming that the board is rectangular.
func CountRows(board GameBoard) int {
	return len(board)
}

// CountColumns takes as input a GameBoard and returns the number of columns
// in the board, assuming that the board is rectangular.
func CountColumns(board GameBoard) int {
	// assert that we have a rectangular board
	AssertRectangular(board)

	// we can assume board is rectangular now
	// so number of columns is # of elements in 0-th row
	return len(board[0])
}

// AssertRectangular takes as input a GameBoard.
// If returns nothing. If the board has no rows, or is not rectangular, it panics.
func AssertRectangular(board GameBoard) {
    if len(board) == 0 {
        panic("Error: no rows in GameBoard.")
    }

    firstRowLength := len(board[0])

    //range over rows and make sure that they have the same length as first row
    for row := 1; row < len(board); row++ {
        if len(board[row]) != firstRowLength {
            panic("Error: GameBoard is not rectangular.")
        }
    }
}
Updating a single cell
The final subroutine of UpdateBoard() is UpdateCell(), which is a short function whose pseudocode is reproduced below. We convert the neighborhood of currentBoard[r][c] to a string neighborhood based on whether neighborhoodType is "Moore" or "vonNeumann". Then, we plug neighborhood into our map rules to determine the integer state of currentBoard[r][c] in the next generation.
UpdateCell(currentBoard, r, c, neighborhoodType, rules)
    neighborhood ← NeighborhoodToString(currentBoard, r, c, neighborhoodType)
    return rules[neighborhood]
When we convert UpdateCell() to Go, we need to ensure that rules[neighborhood] exists. If so, then we will return rules[neighborhood]. If not, then we will update the state of the cell to be zero, our default state.
// UpdateCell takes a GameBoard along with row and column indices, a neighborhood type, and a rule map.
// It returns the state of the cell at this row and column in the next generation of the  update cell state at given row and col indices.
func UpdateCell(board GameBoard, r, c int, neighborhoodType string, rules map[string]int) int {
	// range through rules and look for a match ... very different for the two neighborhood types
	neighborhood := NeighborhoodToString(board, r, c, neighborhoodType)
	rule, exists := rules[neighborhood]
	if exists {
		return rule
	}
	// default rule: 0
	return 0
}
Note: Another possibility is that we return -1 as the default. The question will be how to color a cell that has a value of -1, since it is not a valid state. In our case, it will be easier if we simply convert a cell to “dead” (state zero) if no rule applies to it.
The nitty gritty: converting a neighborhood to a string
We are now ready to implement NeighborhoodToString(), which takes as input a GameBoard currentBoard, integers r and c, and a string neighborhoodType (indicating either "Moore" or "vonNeumann"). It returns the neighborhood of currentBoard[r][c] as a string according to neighborhoodType.
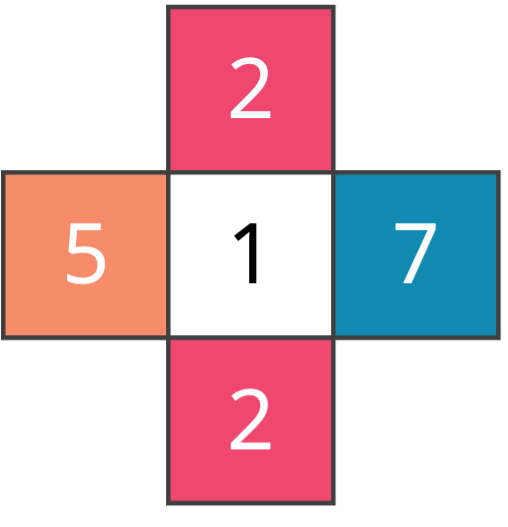
Recall that if neighborhoodType is "Moore", then the first character of the string encodes the state of currentBoard[r][c], and the next eight characters encode the states of the neighbors of the cell. Our convention is to read the neighbors clockwise from top left. For example, the neighborhood string of the central square in the R pentomino, reproduced below, is 101100101.

If neighborhoodType is "vonNeumann", then the neighborhood string of currentBoard[r][c] will consist of the cell’s state in addition to those of its four neighbors; our convention is to read the neighbors clockwise, starting with the top neighbor. For example, the neighborhood string of the board in the figure below on the right is "12725".
We recall the pseudocode of NeighborhoodToString() below. This function generates a collection of ordered pairs (arrays of length 2) called offsets, which represent all the pairs of x- and y- values needed to add to r and c to generate all neighbors of currentBoard[r][c].
NeighborhoodToString(currentBoard, r, c, neighborhoodType)
    neighborhood ← "" + currentBoard[r][c]
    offsets ← empty two-dimensional array
    if neighborhoodType = "Moore"
        offsets ← [[-1, -1], [-1, 0], [-1, 1], [0, 1], [1, 1], [1, 0], [1, -1], [0, -1]]
    else if neighborhoodType = "vonNeumann"
        offsets ← [[-1, 0], [0, 1], [1, 0], [0, -1]]
    for i ← 0 to len(offsets) - 1
        x ← offsets[i][0]
        y ← offsets[i][1]
        if InField(currentBoard, r+x, c+y)
            neighborhood ← neighborhood + currentBoard[r+x][c+y]
        else
            neighborhood ← neighborhood + "0"
    return neighborhood
To implement this function in Go, the first thing that we will do is declare the neighborhood to be currentBoard[r][c] converted to a string neighborhood. Once we generate this string, we will eventually return it.
// NeighborhoodToString takes as input a GameBoard, row and column indices,
// and a neighborhood type as a string.
// It returns a string formed of the central square followed by its neighbors
// according to the neighborhood type indicated.
func NeighborhoodToString(currentBoard GameBoard, r int, c int, neighborhoodType string) string {
	// Initialize the neighborhood string with the current cell value
	neighborhood := strconv.Itoa(currentBoard[r][c])

	// to fill in

	return neighborhood
}
Next, we initialize offsets, which is a list of ordered pairs. An ordered pair is just an array of length 2, and so offsets will be a slice of these arrays, which has type [][2]int.
// NeighborhoodToString takes as input a GameBoard, row and column indices,
// and a neighborhood type as a string.
// It returns a string formed of the central square followed by its neighbors
// according to the neighborhood type indicated.
func NeighborhoodToString(currentBoard GameBoard, r int, c int, neighborhoodType string) string {
	// Initialize the neighborhood string with the current cell value
	neighborhood := strconv.Itoa(currentBoard[r][c])

	// Initialize the offsets based on the neighborhood type
	var offsets [][2]int

	// to fill in

	return neighborhood
}
Based on the neighborhood type, we will set offsets. Because offsets contains either 8 or 4 elements, we will use a slice literal to do so.
Note: The order of the elements inoffsetsis chosen so that we access the cells in the neighborhood ofcurrentBoard[r][c]according to the order that we previously specified.
// NeighborhoodToString takes as input a GameBoard, row and column indices,
// and a neighborhood type as a string.
// It returns a string formed of the central square followed by its neighbors
// according to the neighborhood type indicated.
func NeighborhoodToString(currentBoard GameBoard, r int, c int, neighborhoodType string) string {
	// Initialize the neighborhood string with the current cell value
	neighborhood := strconv.Itoa(currentBoard[r][c])

	// Initialize the offsets based on the neighborhood type
	var offsets [][2]int
	if neighborhoodType == "Moore" {
		offsets = [][2]int{
			{-1, -1}, {-1, 0}, {-1, 1},
			{0, 1}, {1, 1}, {1, 0},
			{1, -1}, {0, -1},
		}
	} else if neighborhoodType == "vonNeumann" {
		offsets = [][2]int{
			{-1, 0}, {0, 1}, {1, 0}, {0, -1},
		}
	}

	// to fill in

	return neighborhood
}
It only remains to range over every element in offsets, and for each such array of length 2, set x equal to the first element and y equal to the second element. If (r + x, c + y) is within the boundaries of the board, then we will append its string conversion to the neighborhood; otherwise, we will append the default value of "0".
// NeighborhoodToString takes as input a GameBoard, row and column indices,
// and a neighborhood type as a string.
// It returns a string formed of the central square followed by its neighbors
// according to the neighborhood type indicated.
func NeighborhoodToString(currentBoard GameBoard, r int, c int, neighborhoodType string) string {
	// Initialize the neighborhood string with the current cell value
	neighborhood := strconv.Itoa(currentBoard[r][c])

	// Initialize the offsets based on the neighborhood type
	var offsets [][2]int
	if neighborhoodType == "Moore" {
		offsets = [][2]int{
			{-1, -1}, {-1, 0}, {-1, 1},
			{0, 1}, {1, 1}, {1, 0},
			{1, -1}, {0, -1},
		}
	} else if neighborhoodType == "vonNeumann" {
		offsets = [][2]int{
			{-1, 0}, {0, 1}, {1, 0}, {0, -1},
		}
	}

	// Iterate over the offsets to construct the neighborhood string
	for _, offset := range offsets {
		x := offset[0]
		y := offset[1]
		if InField(currentBoard, r+x, c+y) {
			neighborhood += strconv.Itoa(currentBoard[r+x][c+y])
		} else { // default case
			neighborhood += "0"
		}
	}

	return neighborhood
}
Implementing NeighborhoodToString() requires us to write an InField() subroutine function, which is identical to the one that we wrote when we implemented the Game of Life, and so we provide it in the starter code.
// InField takes a GameBoard board as well as row and col indices (i, j).
// It returns true if board[i][j] is in the board and false otherwise.
func InField(board GameBoard, i, j int) bool {
	if i < 0 || j < 0 {
		return false
	}
	if i >= CountRows(board) || j >= CountColumns(board) {
		return false
	}
	// if we survive to here, then we are on the board
	return true
}
Parsing a board and a collection of rules
We next turn to writing functions in io.go that will parse in data. As when implementing the Game of Life, we have a collection of initial automata in the boards directory that are represented as comma-separated integers. This time, however, we also have rule sets in the rules directory, which we will detail soon.
For now, we point out that our first function, ReadBoardFromFile(), is identical to its counterpart from our work with the Game of Life, and is therefore provided as part of the starter code.
// ReadBoardFromFile takes a filename as a string and reads in the data provided
// in this file, returning a game board.
func ReadBoardFromFile(filename string) GameBoard {
    // try reading in the file
    fileContents, err := os.ReadFile(filename)
    Check(err)

    // parse out the file contents as a slice of strings, one line per element
    giantString := string(fileContents)
    trimmedGiantString := strings.TrimSpace(giantString)
    lines := strings.Split(trimmedGiantString, "\n")

    // we know how many rows the GameBoard will have
    board := make(GameBoard, len(lines))

    // next, parse the data on each line and add to the GameBoard
    for i, currentLine := range lines {
        lineElements := strings.Split(currentLine, ",")

        // use a subroutine to set the values of the current row
        board[i] = SetRowValues(lineElements)
    }

    return board
}
The subroutine SetRowValues() called by ReadBoardFromFile() requires us to modify the version from the Game of Life. When we access a given string representing a single element of the board, rather than converting it to a boolean value, we simply convert it to an integer using strconv.Atoi().
// SetRowValues takes as input a slice of strings,
// where each element is a nonnegative integer.
// It parses these strings into a slice of integers.
func SetRowValues(lineElements []string) []int {
	currentRow := make([]int, len(lineElements))

	//range through the current line elements and set values
	for i := range currentRow {
		val, err := strconv.Atoi(lineElements[i])
		Check(err)
		currentRow[i] = val
	}

	return currentRow
}
We also need to parse rulesets, which are contained in the rules directory. For each file in this folder, a given line corresponds to a single rule. For example, in langtonRules.txt, the line 12725:5 indicates that a cell that has state 1 and the von Neumann neighbors (in clockwise order) 2, 7, 2, and 5 will be updated as belonging to state 5 in the next generation. This rule is illustrated in the figure below.
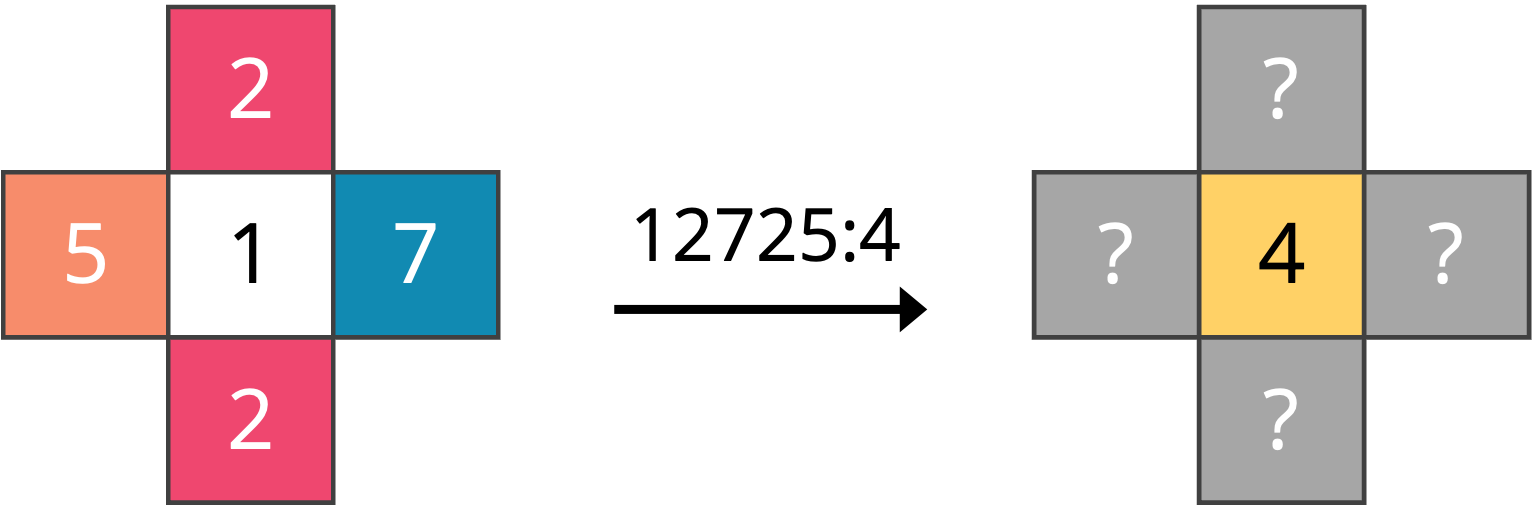
12725:5 for von Neumann neighborhoods. Each cell’s color is tied to its state and is based on the colors we will use for generating Langton loops.We will now implement ReadRulesFromFile(), which takes as input a string corresponding to a file name and returns a map of strings to integers ruleStrings representing the rule set encoded in that file, mapping a neighborhood string to a cell’s state in the next generation. For the above figure, we will have ruleStrings["12725"] = 4.
We begin by declaring ruleStrings, which we will eventually return.
// ReadRulesFromFile takes a filename as a string and reads the rule strings provided in this file.
// It stores the result in a map of strings to integers.
func ReadRulesFromFile(filename string) map[string]int {
	// create the map to store the rules
	ruleStrings := make(map[string]int)

	// to fill in

	return ruleStrings
}
We next attempt to read in the file into a large slice of symbols fileContents, and check if there was any error using the Check() subroutine that we used when implementing the Game of Life.
// ReadRulesFromFile takes a filename as a string and reads the rule strings provided in this file.
// It stores the result in a map of strings to integers.
func ReadRulesFromFile(filename string) map[string]int {
	// create the map to store the rules
	ruleStrings := make(map[string]int)

	// try reading in the file
	fileContents, err := os.ReadFile(filename)

	Check(err)

	// to fill in

	return ruleStrings
}

// Check takes as input a variable of error type.
// If the variable has any value other than nil, it panics.
func Check(e error) {
	if e != nil {
		log.Fatal(e)
	}
}
We then convert fileContents into a large string, which we trim leading space from, then split into a slice of strings lines (one string for each line of the file) using strings.Split().
// ReadRulesFromFile takes a filename as a string and reads the rule strings provided in this file.
// It stores the result in a map of strings to integers.
func ReadRulesFromFile(filename string) map[string]int {
	// create the map to store the rules
	ruleStrings := make(map[string]int)

	// try reading in the file
	fileContents, err := os.ReadFile(filename)

	Check(err)

	// parse out the file contents as a slice of strings, one line per element
	giantString := string(fileContents)
	trimmedGiantString := strings.TrimSpace(giantString)
	lines := strings.Split(trimmedGiantString, "\n")

	// to fill in

	return ruleStrings
}
Finally, we range over all the elements of lines. For each such element currentLine, we parse the string into a slice of strings parts by separating currentLine at the colon. If all goes well, then parts should comprise two elements: parts[0] is the neighborhood string of the current rule, and parts[1] is a string corresponding to the updated value of the cell according to the rule. We just need to convert this latter string to an integer, and then set the current element of ruleStrings.
// ReadRulesFromFile takes a filename as a string and reads the rule strings provided in this file.
// It stores the result in a map of strings to integers.
func ReadRulesFromFile(filename string) map[string]int {
	// create the map to store the rules
	ruleStrings := make(map[string]int)

	// try reading in the file
	fileContents, err := os.ReadFile(filename)

	Check(err)

	// parse out the file contents as a slice of strings, one line per element
	giantString := string(fileContents)
	trimmedGiantString := strings.TrimSpace(giantString)
	lines := strings.Split(trimmedGiantString, "\n")

	// next, parse the data on each line and add to the ruleStrings map
	for _, currentLine := range lines {
		parts := strings.Split(currentLine, ":")
		if len(parts) == 2 {
			// first element is the neighborhood string, and the second element is the new state
			neighborhoodString := parts[0]
			newState, err := strconv.Atoi(parts[1])
			Check(err)
			ruleStrings[neighborhoodString] = newState
		}
	}

	return ruleStrings
}
Drawing automata
We next turn to drawing.go, which will contain code for drawing automata to images using the functions in canvas.go. Our highest level function is DrawGameBoards(), which ranges over the boards in a given slice of GameBoard objects and draws each of them by calling a subroutine DrawGameBoard(). We can safely copy over this function from our work with the Game of Life, which is why it is present in the starter code.
// DrawGameBoards takes as input a slice of (rectangular) GameBoards and an integer cellWidth.
// It returns a slice of Image objects corresponding to each of these GameBoards,
// where each cell in the image has width and height equal to cellWidth.
func DrawGameBoards(boards []GameBoard, cellWidth int) []image.Image {
	numGenerations := len(boards)
	imageList := make([]image.Image, numGenerations)
	for i := range boards {
		imageList[i] = DrawGameBoard(boards[i], cellWidth)
	}
	return imageList
}
DrawGameBoard() will be quite different, since we are drawing an arbitrary automaton that will be able to take several different states instead of just two. By inspection of the Game of Life files in the boards folder, you can see that we use 0 to represent false and 1 to represent true. Accordingly, we want to make sure that we preserve the Game of Life color coding when we extend it to other automata.
In particular, the color coding that we will use is shown in the table below, which associates state numbers to the RGB codes of the colors that we will assign to these states. We also color the background of each row to show the color that we will use.
| State | RGB codes |
|---|---|
| 0 | (60, 60, 60) |
| 1 | (255, 255, 255) |
| 2 | (239, 71, 111) |
| 3 | (6, 214, 160) |
| 4 | (255, 255, 0) |
| 5 | (255, 165, 0) |
| 6 | (160, 32, 240) |
| 7 | (17, 138, 178) |
| 8 | (0, 0, 0) |
We will now write DrawGameBoard(). We begin by creating the canvas c to have the appropriate height and width. We will eventually return c.GetImage(), the Image object associated with c.
// DrawGameBoard takes as input a (rectangular) GameBoard and an integer cellWidth.
// It returns an Image object corresponding to the GameBoard,
// where each cell in the image has width and height equal to cellWidth.
func DrawGameBoard(board GameBoard, cellWidth int) image.Image {
	numRows := CountRows(board)
	numColumns := CountColumns(board)

	// create the canvas
	height := numRows * cellWidth
	width := numColumns * cellWidth
	c := canvas.CreateNewCanvas(width, height)

	// to fill in

	return c.GetImage()
}
Next, we declare our colors, and we set the board’s background as dark gray.
// DrawGameBoard takes as input a (rectangular) GameBoard and an integer cellWidth.
// It returns an Image object corresponding to the GameBoard,
// where each cell in the image has width and height equal to cellWidth.
func DrawGameBoard(board GameBoard, cellWidth int) image.Image {
	numRows := CountRows(board)
	numColumns := CountColumns(board)

	// create the canvas
	height := numRows * cellWidth
	width := numColumns * cellWidth
	c := canvas.CreateNewCanvas(width, height)

	// declare colors
	darkGray := canvas.MakeColor(60, 60, 60)
	white := canvas.MakeColor(255, 255, 255)
	red := canvas.MakeColor(239, 71, 111)
	green := canvas.MakeColor(6, 214, 160)
	yellow := canvas.MakeColor(255, 255, 0)
	orange := canvas.MakeColor(255, 165, 0)
	purple := canvas.MakeColor(160, 32, 240)
	blue := canvas.MakeColor(17, 138, 178)
	black := canvas.MakeColor(0, 0, 0)

	//set the entire board as dark gray
	c.SetFillColor(darkGray)
	c.Clear()

	// to fill in

	return c.GetImage()
}
We then range over all cells of the board, setting the fill color based on the state assigned to board[i][j]
// DrawGameBoard takes as input a (rectangular) GameBoard and an integer cellWidth.
// It returns an Image object corresponding to the GameBoard,
// where each cell in the image has width and height equal to cellWidth.
func DrawGameBoard(board GameBoard, cellWidth int) image.Image {
	numRows := CountRows(board)
	numColumns := CountColumns(board)

	// create the canvas
	height := numRows * cellWidth
	width := numColumns * cellWidth
	c := canvas.CreateNewCanvas(width, height)

	// declare colors
	darkGray := canvas.MakeColor(60, 60, 60)
	white := canvas.MakeColor(255, 255, 255)
	red := canvas.MakeColor(239, 71, 111)
	green := canvas.MakeColor(6, 214, 160)
	yellow := canvas.MakeColor(255, 255, 0)
	orange := canvas.MakeColor(255, 165, 0)
	purple := canvas.MakeColor(160, 32, 240)
	blue := canvas.MakeColor(17, 138, 178)
	black := canvas.MakeColor(0, 0, 0)

	//set the entire board as dark gray
	c.SetFillColor(darkGray)
	c.Clear()

	// fill in colored squares
	for i := range board {
		for j := range board[i] {
			switch board[i][j] {
			case 0:
				c.SetFillColor(darkGray)
			case 1:
				c.SetFillColor(white)
			case 2:
				c.SetFillColor(red)
			case 3:
				c.SetFillColor(green)
			case 4:
				c.SetFillColor(yellow)
			case 5:
				c.SetFillColor(orange)
			case 6:
				c.SetFillColor(purple)
			case 7:
				c.SetFillColor(blue)
			case 8:
				c.SetFillColor(black)
			default:
				panic("Error: Out of range value " + strconv.Itoa(board[i][j]) + " in board when drawing board.")
			}

			// to fill in
		}
	}

	return c.GetImage()
}
Note: The astute reader may notice inlangtonRules.txtthat there are nine different states, represented by the integers 0 to 8, inclusively. This fact is seemingly contradictory to the statement from the core text that Langton’s loops have eight states. Our automaton has an additional cell because Langton originally had cells within his self-replicator that had the same state as the default (dead) cells in the background. We would like these cells to be visible against the background, and so we separated these cells out as a ninth state.
Finally, we draw the circle so that its center is in the middle of the cell and its radius is equal to half of cellWidth. This code is the same as when we drew a Game of Life board. In this case, because the canvas’s background has the color of the default zero value, we only need to generate a draw a circle if its state is nonzero.
// DrawGameBoard takes as input a (rectangular) GameBoard and an integer cellWidth.
// It returns an Image object corresponding to the GameBoard,
// where each cell in the image has width and height equal to cellWidth.
func DrawGameBoard(board GameBoard, cellWidth int) image.Image {
	numRows := CountRows(board)
	numColumns := CountColumns(board)

	// create the canvas
	height := numRows * cellWidth
	width := numColumns * cellWidth
	c := canvas.CreateNewCanvas(width, height)

	// declare colors
	darkGray := canvas.MakeColor(60, 60, 60)
	white := canvas.MakeColor(255, 255, 255)
	red := canvas.MakeColor(239, 71, 111)
	green := canvas.MakeColor(6, 214, 160)
	yellow := canvas.MakeColor(255, 255, 0)
	orange := canvas.MakeColor(255, 165, 0)
	purple := canvas.MakeColor(160, 32, 240)
	blue := canvas.MakeColor(17, 138, 178)
	black := canvas.MakeColor(0, 0, 0)

	//set the entire board as dark gray
	c.SetFillColor(darkGray)
	c.Clear()

	// fill in colored squares
	for i := range board {
		for j := range board[i] {
			switch board[i][j] {
			case 0:
				c.SetFillColor(darkGray)
			case 1:
				c.SetFillColor(white)
			case 2:
				c.SetFillColor(red)
			case 3:
				c.SetFillColor(green)
			case 4:
				c.SetFillColor(yellow)
			case 5:
				c.SetFillColor(orange)
			case 6:
				c.SetFillColor(purple)
			case 7:
				c.SetFillColor(blue)
			case 8:
				c.SetFillColor(black)
			default:
				panic("Error: Out of range value " + strconv.Itoa(board[i][j]) + " in board when drawing board.")
			}

			//only need to draw circle if it's not dead since it would equal background color
			if board[i][j] != 0 {
				// set circle's central coordinates
				x := float64(j*cellWidth) + float64(cellWidth)/2
				y := float64(i*cellWidth) + float64(cellWidth)/2

				scalingFactor := 0.8 // to make circle smaller

				c.Circle(float64(x), float64(y), scalingFactor*float64(cellWidth)/2)
				c.Fill()
			}
		}
	}

	return c.GetImage()
}
Running our automaton
We are now ready to run our simulation in main.go. We begin by taking in six command-line arguments via os.Args:
- (String) The neighborhood type (“vonNeumann” or “Moore”).
- (String) The location of the rule set.
- (String) The file location of the initial board file.
- (String) The file location where we should write the animated GIF of the automaton.
- (Integer) The width in pixels of each cell.
- (Integer) The number of generations to run our simulation.
After parsing these arguments, we will print a message to the console that they have been read successfully. We provide this code in func main() as part of the starter code.
func main() {
	fmt.Println("Cellular automata!")

	neighborhood := os.Args[1]     // "vonNeumann" or "Moore"
	ruleFile := os.Args[2]         // where are rule strings found?
	initialBoardFile := os.Args[3] // my starting GameBoard file name
	outputFile := os.Args[4]       // where to draw the final animated GIF of boards

	// how many pixels wide should each cell be?
	cellWidth, err := strconv.Atoi(os.Args[5])
	if err != nil {
		panic("Error: Problem converting cell width parameter to an integer.")
	}

	// how many generations to play the automaton?
	numGens, err2 := strconv.Atoi(os.Args[6])
	if err2 != nil {
		panic("Error: Problem converting number of generations to an integer.")
	}

	fmt.Println("Parameters read in successfully!")
}
Note: Technically, reading in a value of neighborhood is redundant, since we could infer whether we are considering a von Neumann or Moore neighborhood based on the length of rules in the rule set.
Next, we will call ReadRulesFromFile() and ReadBoardFromFile() to read in the rule set and the initial board, again printing a message if we are successful.
func main() {
	fmt.Println("Cellular automata!")

	// ...

	ruleStrings := ReadRulesFromFile(ruleFile)
	fmt.Println("Rules are read in successfully!")

	initialBoard := ReadBoardFromFile(initialBoardFile)

        fmt.Println("Board read in successfully. Ready to simulate the automaton.")

        // to fill in

}
Finally, we call PlayAutomaton() to run the simulation, DrawGameBoards() on the resulting slice of GameBoard objects, and gifhelper.ImagesToGIF() to convert the resulting images to a GIF.
func main() {
	fmt.Println("Cellular automata!")

        // ...

	boards := PlayAutomaton(initialBoard, numGens, neighborhood, ruleStrings)

	fmt.Println("Automaton simulated. Now, drawing images.")

	imglist := DrawGameBoards(boards, cellWidth)

	fmt.Println("Boards drawn to images! Now, convert to animated GIF.")

	gifhelper.ImagesToGIF(imglist, outputFile)

	fmt.Println("Success! GIF produced.")
}
It is time to run the simulation. After making sure to save all your files, navigate into go/src/cellularAutomata from the command line and compile your code by executing the command go build.
Then, we can check to make sure that our code is working correctly by ensuring that it can still replicate the Game of Life. To do so, execute the following command to generate the Gosper gun (on a Windows machine, replace ./cellularAutomata with cellularAutomata.exe).
./cellularAutomata Moore rules/goLRules.txt boards/gosperGun.csv output/gosperGun 20 400
Once we are running the Game of Life, let’s run the first 50 generations of Langton’s loop by executing the following (Mac) command:
./cellularAutomata vonNeumann rules/langtonRules.txt boards/langtonLoop.csv output/langtonLoop 20 50
If everything is in order, then you will see the GIF appear at output/langtonLoop.gif. The loops are pretty, but we have not run the simulation for enough generations to observe self-replication. To do so, let’s increase the number of generations from 50 to 900 by executing the following command, which may take a minute or two to complete.
./cellularAutomata vonNeumann rules/langtonRules.txt boards/langtonLoop.csv output/langtonLoop 20 900
Note: If your computer struggles to generate such a large GIF, consider lowering thecellWidthcommand-line argument to 5 or 10.
You will now witness the radiant splendor of the self-replicating Langton loops, shown below. Like us, they are born, live frantically, reproduce, and die.
Time to practice!
After you have the chance to check your work below, you are ready to apply what you have learned to the chapter’s exercises. Or, you can carry on to the next chapter, where we will learn about how generating random numbers can help us simulate a presidential election.
Check your work from the code along
We provide autograders in the window below (or via a direct link) allowing you to check your work for the following functions:
NeighborhoodToString()UpdateCell()UpdateBoard()PlayAutomaton()