Learning objectives
In this code along, we will give an introduction to graphics in Go using the provided canvas package. We will apply our graphics knowledge to represent the Game of Life’s R pentomino as a two-dimensional boolean array and draw it as an image. This will set us up to implement the Game of Life automaton in the next code along.
Code along summary
Setup
To complete this code along and the next code along on implementing the Game of Life, we will need starter code.
We provide this starter code as a single download GameOfLife.zip. Download this code here, and then expand the folder. Move the resulting GameOfLife directory into your go/src source code directory.
The GameOfLife directory contains several files. In this code along, we will work with datatypes.go, drawing.go, and main.go. The remaining files — io.go and functions.go — will be used in the next code along.
To draw our board, we will use the provided canvas package, which lives in your go/src/canvas directory. This package is analogous to Python’s pygame library — it gives us drawing functions for creating images. The functions we will use are listed below.
canvas.CreateNewCanvas(width, height int): creates a new drawing canvas of the given pixel dimensions, analogous topygame.Surface((width, height)).canvas.MakeColor(r, g, b uint8): creates an RGB color value, analogous to a Python RGB tuple such as(255, 255, 255).c.SetFillColor(color): sets the current fill color on the canvas.c.Clear(): fills the entire canvas with the current fill color, analogous tosurface.fill().c.ClearRect(x, y, width, height int): fills a rectangular region with the current fill color, analogous topygame.draw.rect().c.Circle(x, y, radius float64): draws a circle at the given center coordinates and radius, analogous topygame.draw.circle().c.Fill(): fills the most recently drawn shape with the current fill color.c.GetImage(): returns animage.Imagerepresenting the current canvas state, analogous to thepygame.Surfaceobject itself.
Here is what our main.go contains at the start of this code along.
package main

import "fmt"

func main() {
	fmt.Println("Drawing the Game of Life!")
}
Organizing data
We begin with datatypes.go, where we declare a named type for our Game of Life board. Recall that in Python we created a type alias GameBoard = list[list[bool]]. In Go, we declare a named type using the type keyword.
package main

// GameBoard is a two-dimensional slice of Boolean variables
// representing a single generation of a Game of Life board.
type GameBoard [][]bool
Each cell is a bool: true for an alive cell, false for a dead one — a direct parallel to Python’s list[list[bool]].
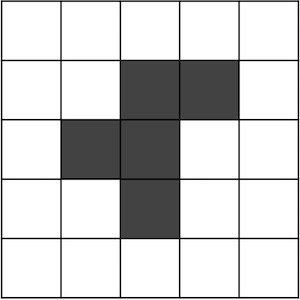
Representing the R pentomino
We will represent the Game of Life board as a two-dimensional slice of booleans, where true means a cell is alive and false means it is dead. The R pentomino is a five-cell pattern that fits inside a 5×5 grid and produces surprisingly complex long-term behavior, eventually generating six gliders.
To build the board in code, we first pre-allocate a 5×5 GameBoard using make(), then set the five live cells to true. Unlike Python, where we can write [[False] * 5 for _ in range(5)] in a single line, in Go we must allocate each row separately.
	board := make(GameBoard, 5)
	for i := range board {
		board[i] = make([]bool, 5)
	}

	// set the five live cells
	board[1][2] = true
	board[1][3] = true
	board[2][1] = true
	board[2][2] = true
	board[3][2] = true
We add this code to main() along with a cellWidth parameter specifying the number of pixels per side for each cell.
func main() {
	fmt.Println("Drawing the Game of Life!")

	cellWidth := 100

	board := make(GameBoard, 5)
	for i := range board {
		board[i] = make([]bool, 5)
	}

	board[1][2] = true
	board[1][3] = true
	board[2][1] = true
	board[2][2] = true
	board[3][2] = true
}
Writing DrawGameBoard()
We now write DrawGameBoard() in drawing.go, which takes a board and a cell width and returns an image.Image with each live cell drawn on it. We will need the following imports.
package main

import (
	"canvas"
	"image"
)
We start with the function signature and stub. Just as Python’s draw_game_board() returned a pygame.Surface, our Go function returns an image.Image, the standard Go interface for a 2D image.
// DrawGameBoard takes as input a GameBoard and an integer cellWidth.
// It returns an image.Image of the board, where each cell occupies a
// cellWidth × cellWidth pixel region.
func DrawGameBoard(board GameBoard, cellWidth int) image.Image {
	// to be implemented...
}
We compute the canvas dimensions from the board size, create the canvas, set up our colors, and fill the background. We use CountRows() and CountCols() as helper functions — we will implement these shortly.
func DrawGameBoard(board GameBoard, cellWidth int) image.Image {
	width := CountCols(board) * cellWidth
	height := CountRows(board) * cellWidth

	c := canvas.CreateNewCanvas(width, height)

	darkGray := canvas.MakeColor(60, 60, 60)
	white := canvas.MakeColor(255, 255, 255)

	c.SetFillColor(darkGray)
	c.Clear()

	// to be implemented...
}
We are now ready to range over every cell in board and draw each alive cell. We don’t need to take any action if the cell is dead, since it will already appear as the background color.
A natural first approach is to fill each alive cell with a solid white square. As we established in the previous code along, x depends on the column index j and y depends on the row index i, so the top-left corner of cell board[i][j] is at pixel coordinates (j*cellWidth, i*cellWidth). We draw a filled square using c.ClearRect(), analogous to Python’s pygame.draw.rect().
	// first attempt: draw alive cells as squares
	for i := range board {
		for j := range board[i] {
			if board[i][j] {
				c.SetFillColor(white)
				c.ClearRect(j*cellWidth, i*cellWidth, cellWidth, cellWidth)
			}
		}
	}

	return c.GetImage()
Here is what this produces for the R pentomino.

Improving our visualization
The squares look a little blocky. Let’s replace each rectangle with a circle instead. To center a circle inside cell board[i][j], we add cellWidth/2 to both the x and y coordinates of the top-left corner. We use cellWidth/2 as the radius so the circle exactly fills the cell. We replace the innermost block as follows.
		if board[i][j] {
			c.SetFillColor(white)
			x := float64(j*cellWidth) + float64(cellWidth)/2
			y := float64(i*cellWidth) + float64(cellWidth)/2
			c.Circle(x, y, float64(cellWidth)/2)
			c.Fill()
		}
After running our code, we obtain the illustration below. The circles are a nice improvement, but notice that neighboring live cells touch — which will make the board harder to read, especially in animations.

Let’s reduce the radius by multiplying it by a scalingFactor of 0.8, shrinking each circle just enough that it no longer reaches the edge of its cell. We compute the radius once before the loops to avoid recomputing it on every iteration. Here is the complete final function.
func DrawGameBoard(board GameBoard, cellWidth int) image.Image {
	width := CountCols(board) * cellWidth
	height := CountRows(board) * cellWidth

	c := canvas.CreateNewCanvas(width, height)

	darkGray := canvas.MakeColor(60, 60, 60)
	white := canvas.MakeColor(255, 255, 255)

	c.SetFillColor(darkGray)
	c.Clear()

	scalingFactor := 0.8
	radius := scalingFactor * float64(cellWidth) / 2

	for i := range board {
		for j := range board[i] {
			if board[i][j] {
				c.SetFillColor(white)
				x := float64(j*cellWidth) + float64(cellWidth)/2
				y := float64(i*cellWidth) + float64(cellWidth)/2
				c.Circle(x, y, radius)
				c.Fill()
			}
		}
	}

	return c.GetImage()
}
Two helper functions
We place the helper functions CountRows() and CountCols() in drawing.go alongside DrawGameBoard(), since they are needed there. We count rows with len(board) and columns with len(board[0]).
STOP: What issue do you see that might arise with these two functions?
// CountRows takes a GameBoard as input and returns its number of rows.
func CountRows(board GameBoard) int {
	return len(board)
}

// CountCols takes a GameBoard as input and returns its number of columns.
// It asserts that the board is rectangular.
func CountCols(board GameBoard) int {
	AssertRectangular(board)
	return len(board[0])
}
The potential issue is that CountCols() accesses board[0], which will panic if the board has no rows, or return a misleading answer if the board is not rectangular. We therefore write an assertion function AssertRectangular() that checks both conditions, analogous to Python’s assert_rectangular(). In Go, we use panic() to stop execution with an error message if the assertion fails.
// AssertRectangular takes as input a GameBoard.
// If the board has no rows, or is not rectangular, it panics.
func AssertRectangular(board GameBoard) {
	if len(board) == 0 {
		panic("Error: no rows in GameBoard.")
	}
	firstRowLength := len(board[0])
	for row := 1; row < len(board); row++ {
		if len(board[row]) != firstRowLength {
			panic("Error: GameBoard is not rectangular.")
		}
	}
}
Calling DrawGameBoard() from main()
With DrawGameBoard() in place, we update main() to call it with our R pentomino and save the result to output/rPentomino.png using Go's standard image/png package.
package main

import (
	"fmt"
	"image/png"
	"os"
)

func main() {
	fmt.Println("Drawing the Game of Life!")

	cellWidth := 100

	board := make(GameBoard, 5)
	for i := range board {
		board[i] = make([]bool, 5)
	}

	board[1][2] = true
	board[1][3] = true
	board[2][1] = true
	board[2][2] = true
	board[3][2] = true

	img := DrawGameBoard(board, cellWidth)

	f, err := os.Create("output/rPentomino.png")
	if err != nil {
		panic(err)
	}
	defer f.Close()

	png.Encode(f, img)
	fmt.Println("Image saved to output/rPentomino.png")
}
STOP: In a new terminal window, navigate into our directory usingcd go/src/GameOfLife. Then run the command below.
go run *.go
When we run our code, we obtain the R pentomino shown below.

Looking ahead
Now that we can represent a Game of Life board as a 2D boolean array and visualize it, we are ready to implement the automaton itself — computing new generations and animating the board over time. Join us in the next code along!