Learning objectives
In this code along, we will give a short introduction to graphics in Go, which will help us in future code alongs to visualize the Game of Life and other cellular automata. We will then use this introduction to make a simple but beautiful drawing of a face that showcases our artistic prowess.
Setup
To complete this code along as well as other code alongs relying on graphics in this and following chapters, you will need starter code that will help us draw objects and generate images.
First, you will need to install a package called "llgcode/draw2d" that we will use for drawing. To install this code into your Go directory, download this code as a .zip file here, and then expand the folder. You will see an llgcode folder that contains draw2d as a directory. In your go/src directory, if you do not already have a github.com folder, then create one. Then, add llgcode to this folder as a subdirectory.
Next, draw2d requires a couple of “dependencies” of other code projects including functions that it calls.
golang/freetype, which can be downloaded here. Expand the file, and then move thegolangfolder intogo/src/github.comalongsidellgcode.golang.org/x/image, which can be downloaded here. Expand the file, and then move thegolang.orgfolder intogo/src.
We also will provide an additional folder called canvas that will communicate with draw2d and allow us to get started more quickly with drawing. You can find canvas here as a .zip. Download this archive, expand it into the canvas folder, and move the canvas folder into your go/src directory.
Finally, create a folder called drawing in your go/src directory and create a text file called main.go in the go/src/drawing folder. We will edit main.go, which should have the following starter code.
package main

import (
    "fmt"
)

func main() {
    fmt.Println("Drawing a head.")
}
Understanding canvas.go: our engine for drawing
Go provides a comprehensive library for drawing via the draw2d directory that we asked you to install as part of the setup for this code along. This directory is not the easiest for a beginner to use directly, which is why we provided some code in the canvas folder, which contains a collection of functions that call code from draw2d so that we can simply use the functions in canvas.
Note: Special thanks to Carl Kingsford and Hannah Kim for putting together thecanvaspackage.
In particular, the canvas package allows us to conceptualize a “canvas” object. We will say much more about working with “object-oriented” programming in a future chapter, but for now, think of a canvas as a rectangular window with a specified width and height, much like the screen that you are reading this on. The width and height of the canvas are measured in pixels, where a pixel is a single (small) point in the image that will be colored with a single color.
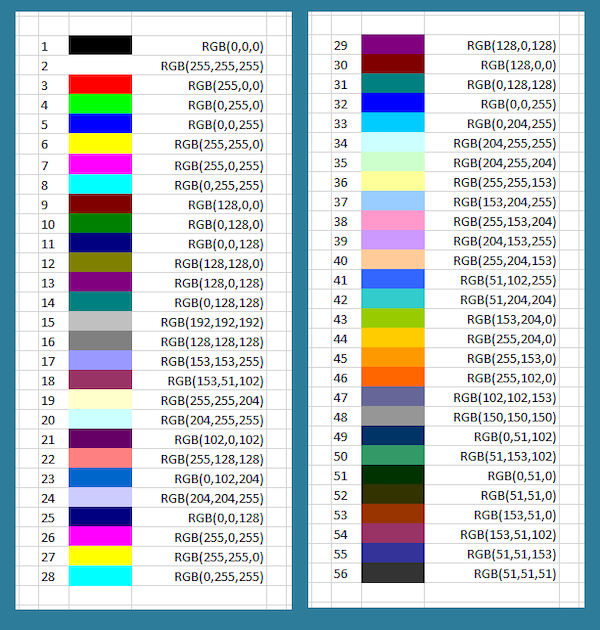
In the RGB color model, every rectangular pixel on a computer screen emits a single color formed as a mixture of differing amounts of the three primary colors of light: red, green, and blue (hence the acronym “RGB”). The intensity of each primary color in a pixel is expressed as an integer between 0 and 255, inclusively, with larger integers corresponding to greater intensities.
A few colors are shown in the figure below along with their RGB equivalents; for example, magenta corresponds to equal parts red and blue. Note that a color like (128, 0, 0) contains only red but appears duskier than (256, 0, 0) because the red in that pixel is less intense.
The functions from canvas.go that we will need in this and the next code along are listed below. We will say more about these functions as they are needed.
CreateNewCanvas(): creates a rectangularcanvasobject with a given width and heightMakeColor(): creates a new colorSetFillColor(): sets the fill colorClear(): fill the entire canvas with the fill colorFill(): fill all shapes that have been drawn with the fill colorClearRect(): draw a rectangle at given coordinates and fill it with the current fill colorCircle(): draw a circle at given coordinatesGetImage(): obtain the image corresponding to the currentcanvas.
Creating a blank canvas
In main.go, instead of putting our code directly into func main(), we will call a function DrawFace(); this function will not take any inputs or return anything, but it will contain code for drawing our image.
func main() {
    fmt.Println("Drawing a head.")

    DrawFace()
}
We will next implement DrawFace(). The first thing that we will do is to create a canvas object, which we will call c. To do so, we will call CreateNewCanvas(), which takes as input two integers w and h and returns a canvas object that is w pixels wide and h pixels tall. In this case, the canvas will be 1000 pixels wide and 2000 pixels tall.
// DrawFace takes no inputs and returns nothing.
// It uses the canvas package to draw a face to a file
// in the output folder.
func DrawFace() {
    // create the canvas
    c := canvas.CreateNewCanvas(1000, 2000)

    // to fill in
}
Next, let’s make the entire canvas black. First, we will declare a variable black (which has type color) by calling canvas.MakeColor(). This function takes three integer inputs between 0 and 255 corresponding to the RGB notation of the color that is returned.
Black is formed by the absence of any light, and so (as the table above illustrates) its RGB format is (0, 0, 0). Therefore, we declare our color variable by using the notation black := canvas.MakeColor(0, 0, 0). We will then set the fill color by calling c.SetFillColor(black), and fill the canvas with this fill color by calling c.Clear().
Note: The notationc.Foo()for a functionFoo()involving a canvas objectcis new up to this point in the course. This type of function is called a “method”, and we will say much more about methods soon when we discuss object-oriented programming in greater detail.
// DrawFace takes no inputs and returns nothing.
// It uses the canvas package to draw a face to a file
// in the output folder.
func DrawFace() {
	// create the canvas
	c := canvas.CreateNewCanvas(1000, 2000)

	// fill canvas as black
	black := canvas.MakeColor(0, 0, 0)
	c.SetFillColor(black)
	c.Clear()

        // to fill in
}
Let’s take a look at the image associated with the canvas. To do so, we will call the function c.SaveToPNG() from canvas.go, which takes as input a file name as a string and saves an image associated with c to this file; we will give this function the string "fun.png".
// DrawFace takes no inputs and returns nothing.
// It uses the canvas package to draw a face to a file
// in the output folder.
func DrawFace() {
	// create the canvas
	c := canvas.CreateNewCanvas(1000, 2000)

	// fill canvas as black
	black := canvas.MakeColor(0, 0, 0)
	c.SetFillColor(black)
	c.Clear()

	// save the image associated with the canvas
	c.SaveToPNG("fun.png")
}
After saving your files, navigate into go/src/drawing from the command line, compile your code by executing the command go build, and run your code by executing either ./drawing (Mac) or drawing.exe (Windows). You should see the black rectangle shown below appear as fun.png in your go/src/drawing directory.

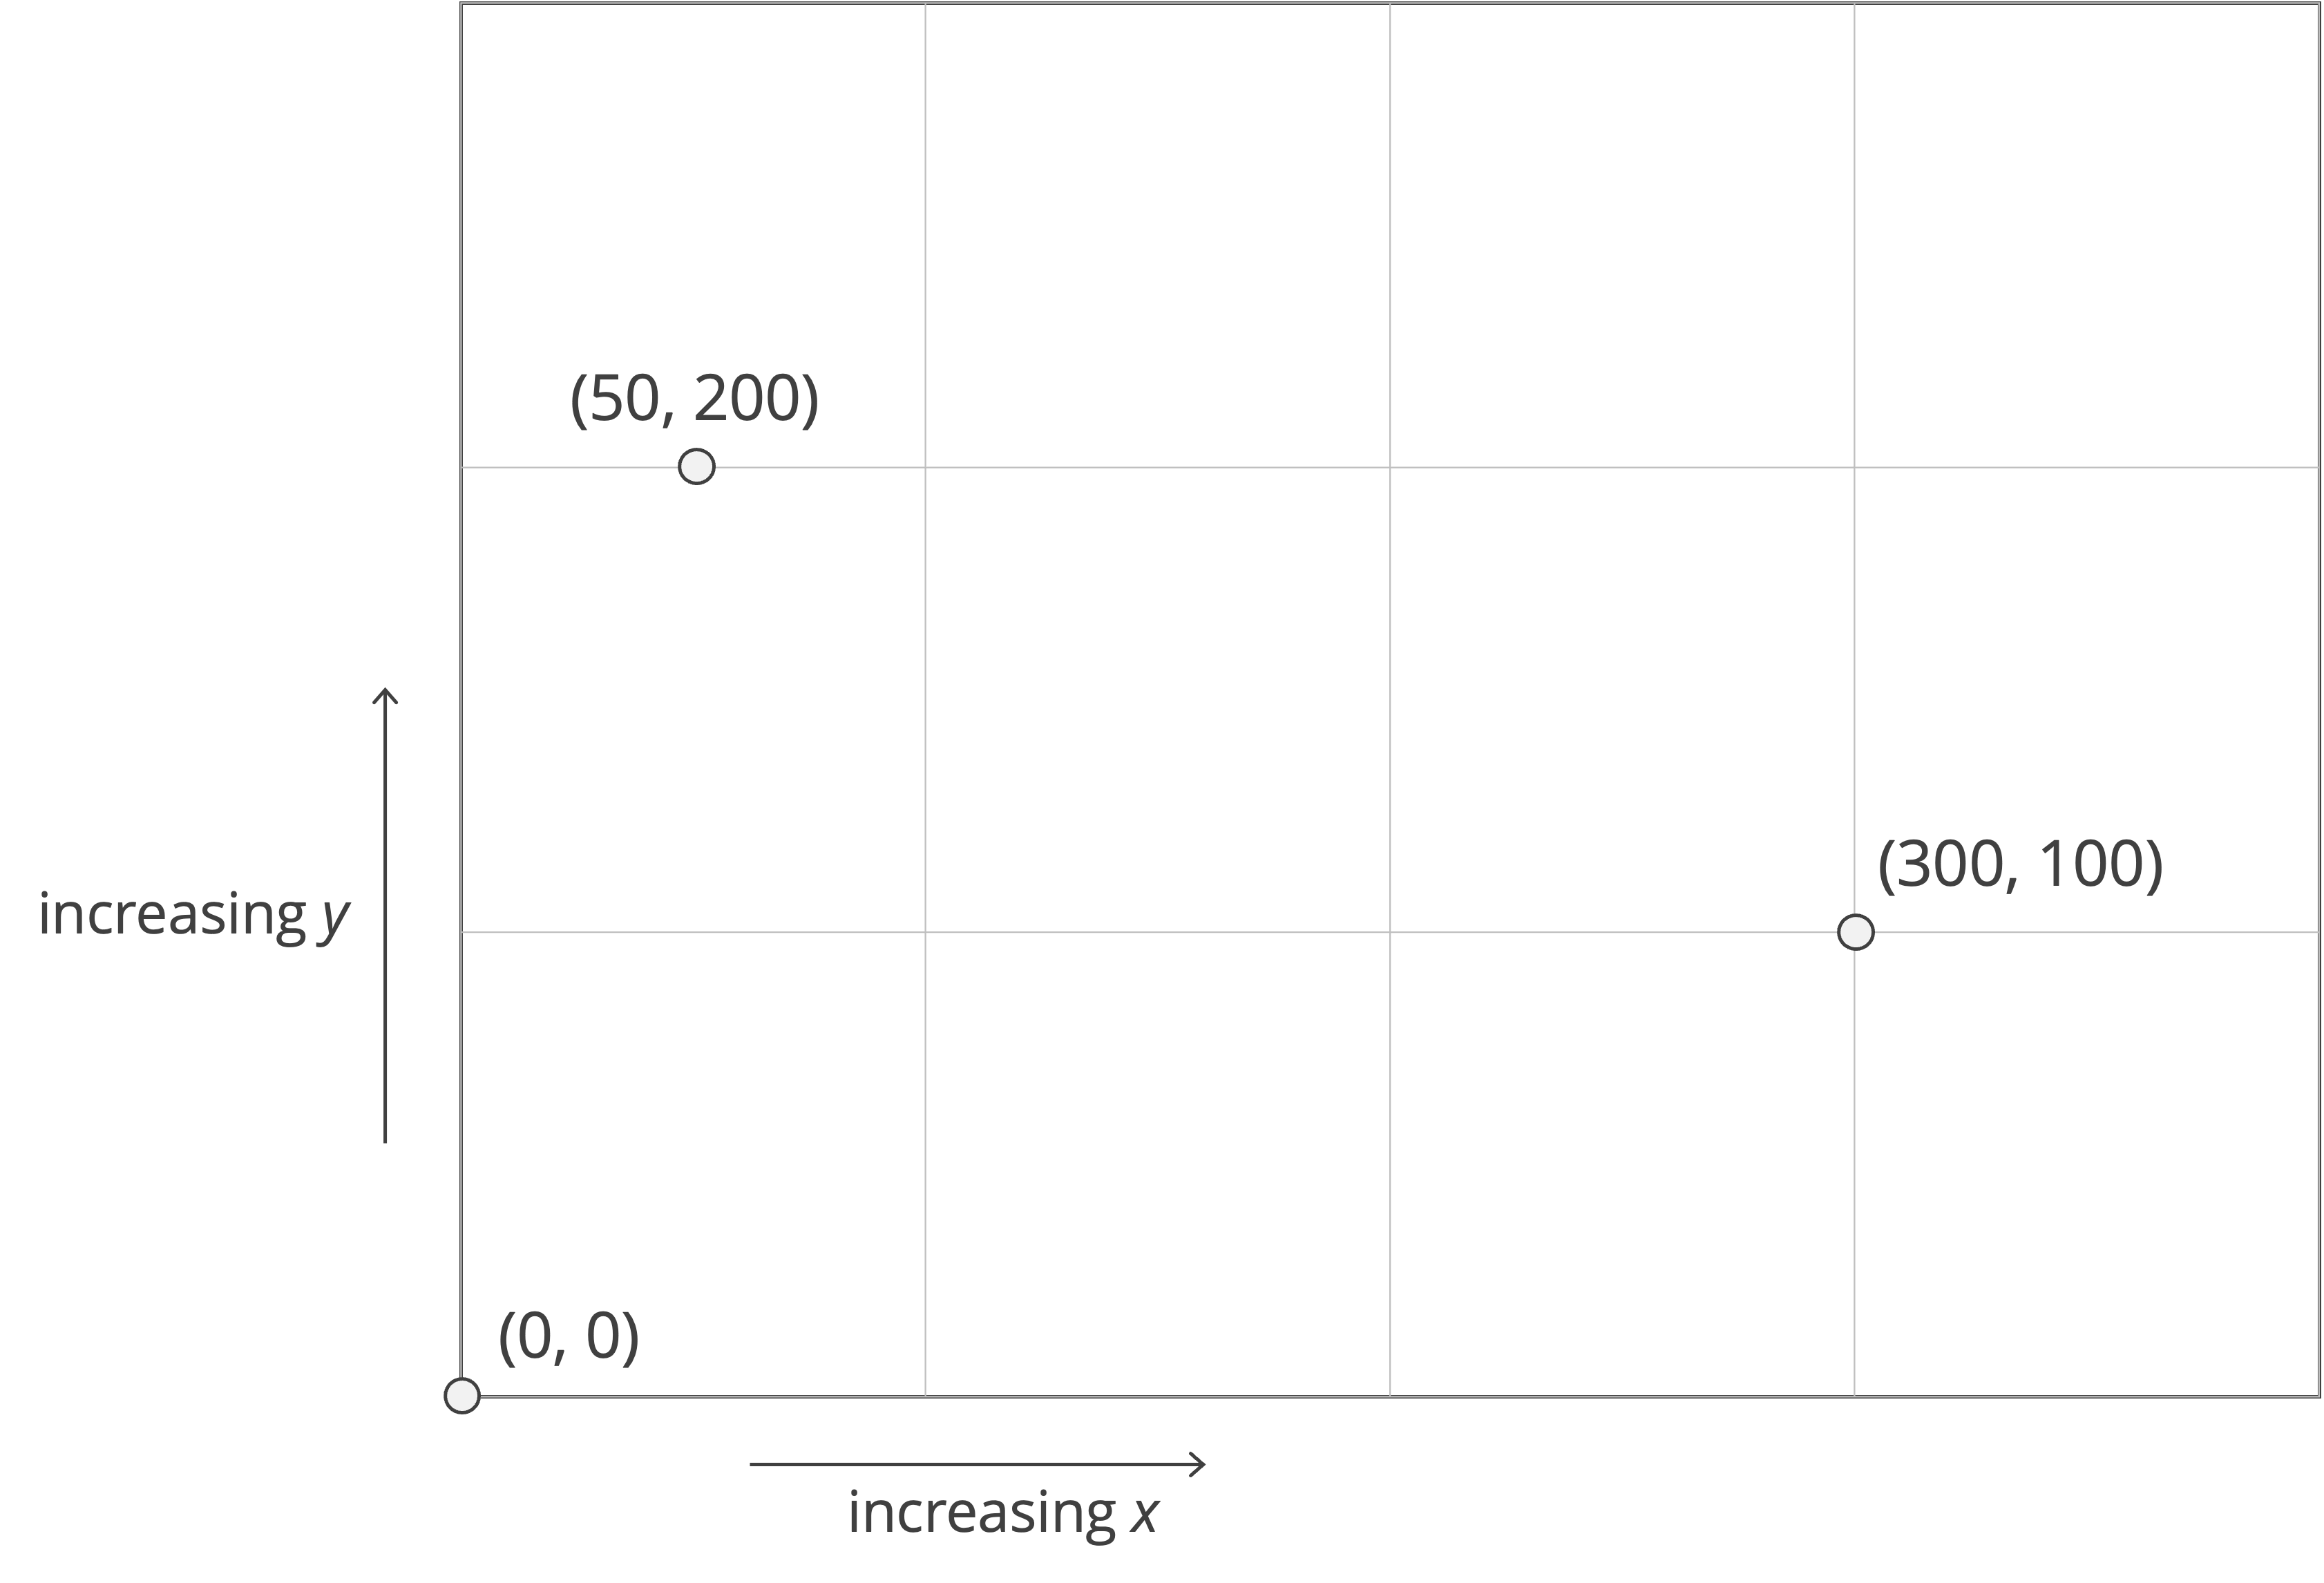
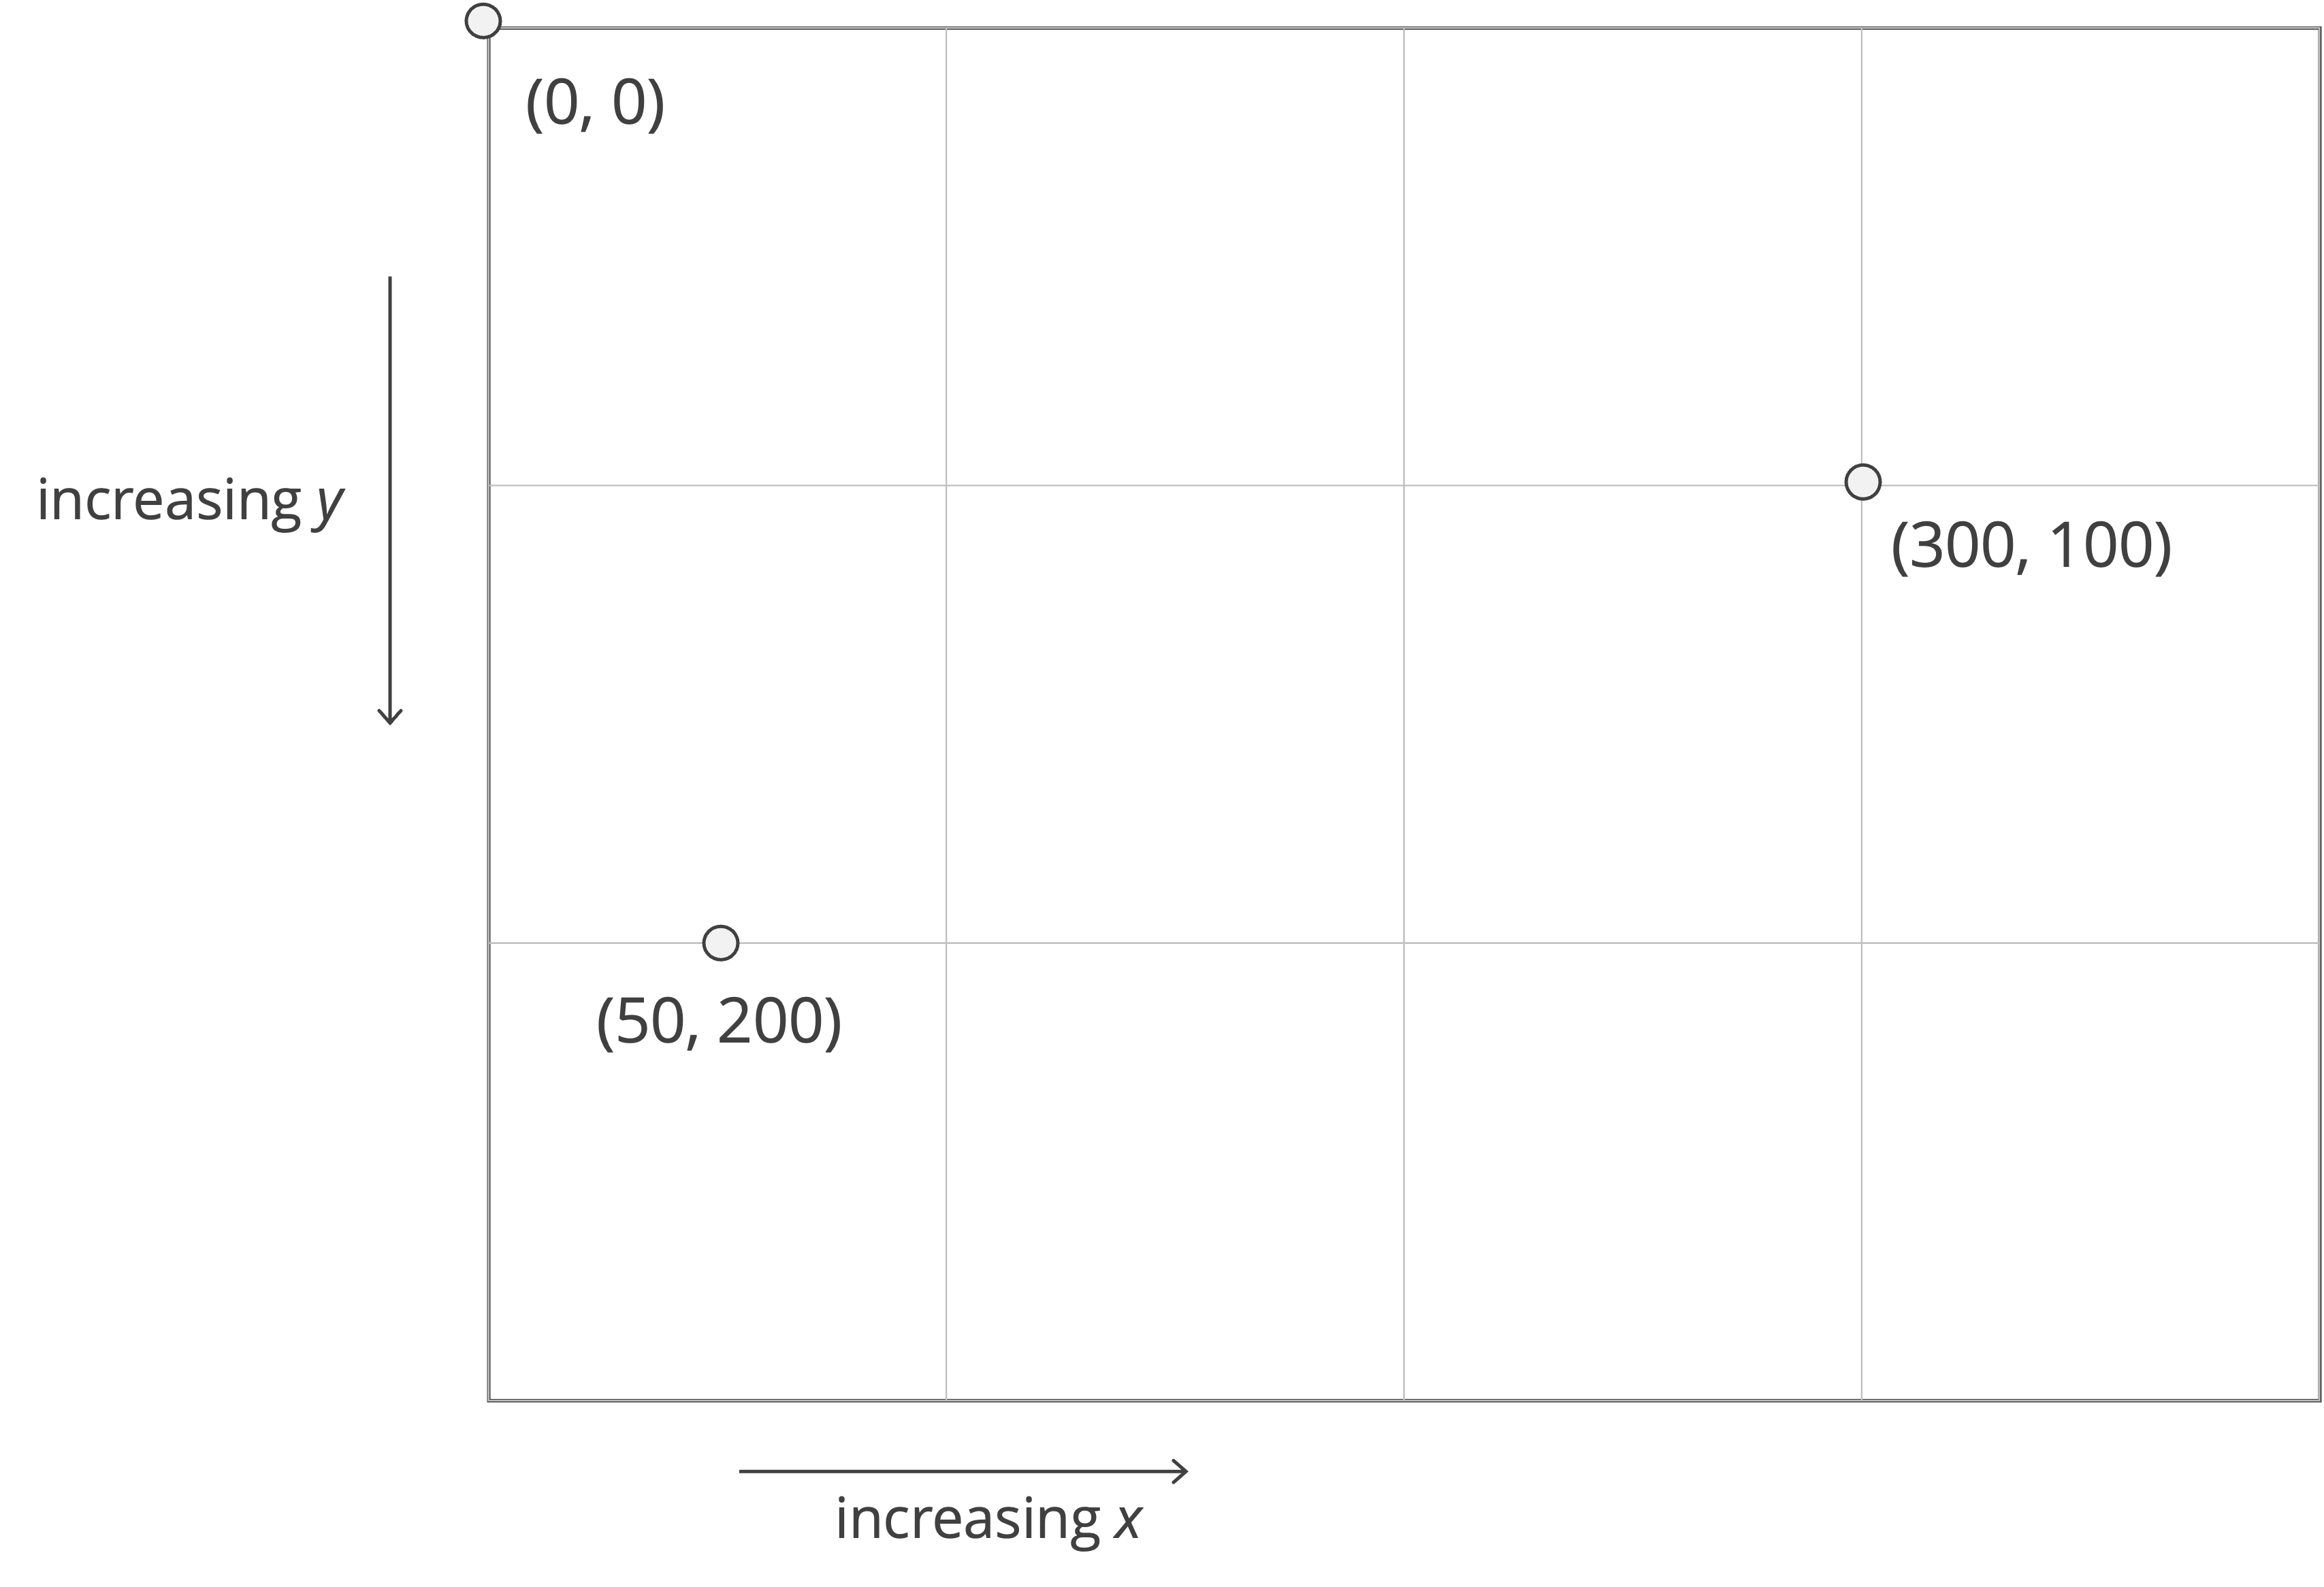
The graphics coordinate system
Before adding a head, we need to understand the canvasdraw2d included) still use the standard of viewing the top left corner of a window as an “origin”, with increasing x-coordinates extending to the right, and increasing y-coordinates extending downward (see figure below, right).
Adding a head
We will draw the head as a white circle. We will first declare a color called white; just as combining red, green, and blue light yields white light, our color variable will constitute the maximum amount of red, green, and blue. We then will set the fill color of c to our newly declared color.
// DrawFace takes no inputs and returns nothing.
// It uses the canvas package to draw a face to a file
// in the output folder.
func DrawFace() {
	// create the canvas
	c := canvas.CreateNewCanvas(1000, 2000)

	// fill canvas as black
	black := canvas.MakeColor(0, 0, 0)
	c.SetFillColor(black)
	c.Clear()

	white := canvas.MakeColor(255, 255, 255)
	c.SetFillColor(white)

	// save the image associated with the canvas
	c.SaveToPNG("fun.png")
}
We now will call the Circle() function from the canvas package. Remember when your geometry teacher told you that a circle is defined by its center and its radius? I know that you don’t, but it’s true nevertheless. When it comes to programming, Circle() takes three float64 arguments: the x- and y- coordinates of the center, followed by the radius.
We want the head to lie in the top part of the rectangle, halfway across from left to right. Because the canvas is 1000 pixels wide, we know that the x-coordinate of the circle’s center should be 500. In order to have the same amount of space on the top, left, and right, let’s make its y-coordinate 500 as well; that is, the circle’s center will be 500 pixels from the top. As for the radius, let’s set it to be 200 pixels.
After calling c.Circle(500, 500, 200), we will call c.Fill() to fill the circle that we have drawn with the current fill color, white.
// DrawFace takes no inputs and returns nothing.
// It uses the canvas package to draw a face to a file
// in the output folder.
func DrawFace() {
	// create the canvas
	c := canvas.CreateNewCanvas(1000, 2000)

	// fill canvas as black
	black := canvas.MakeColor(0, 0, 0)
	c.SetFillColor(black)
	c.Clear()

	white := canvas.MakeColor(255, 255, 255)
	c.SetFillColor(white)

	// make face
	c.Circle(500, 500, 200)
	c.Fill()

	// save the image associated with the canvas
	c.SaveToPNG("fun.png")
}
When we compile and run our code, we obtain the white circle below.

Adding facial features to our head
Let’s next add a nose, which we will draw as a small black circle, whose center will be slightly below the center of the head. First, we will set the fill color to black. The nose’s x-coordinate will therefore be the same as that of the head, but the y-coordinate will be a little bit larger at 550 pixels. As for the radius, let’s make it ten pixels.
// DrawFace takes no inputs and returns nothing.
// It uses the canvas package to draw a face to a file
// in the output folder.
func DrawFace() {
	// create the canvas
	c := canvas.CreateNewCanvas(1000, 2000)

	// fill canvas as black
	black := canvas.MakeColor(0, 0, 0)
	c.SetFillColor(black)
	c.Clear()

	white := canvas.MakeColor(255, 255, 255)
	c.SetFillColor(white)

	// make face
	c.Circle(500, 500, 200)
	c.Fill()

	// make nose
	c.SetFillColor(black)
	c.Circle(500, 550, 10)
	c.Fill()

	// save the image associated with the canvas
	c.SaveToPNG("fun.png")
}
When we compile and run our code, we see the figure shown below.

Next, we will add two eyes, which are once again circles. The eyes will fall slightly above the center of the face, and so we will make their y-coordinates equal to 475. Let’s move them to 75 pixels left and right of the center line, so that their x-coordinates will be 425 and 575. We will set their radii equal to 15 to make the eyes a little bigger than the nose.
// DrawFace takes no inputs and returns nothing.
// It uses the canvas package to draw a face to a file
// in the output folder.
func DrawFace() {
	// create the canvas
	c := canvas.CreateNewCanvas(1000, 2000)

	// fill canvas as black
	black := canvas.MakeColor(0, 0, 0)
	c.SetFillColor(black)
	c.Clear()

	white := canvas.MakeColor(255, 255, 255)
	c.SetFillColor(white)

	// make face
	c.Circle(500, 500, 200)
	c.Fill()

	// make nose
	c.SetFillColor(black)
	c.Circle(500, 550, 10)
	c.Fill()

	// make eyes
	c.Circle(425, 475, 15)
	c.Circle(575, 475, 15)
	c.Fill()

	// save the image associated with the canvas
	c.SaveToPNG("fun.png")
}
Our updated face is shown in the figure below and is starting to take shape as a landmark achievement of Western art.

Finally, we will make a mouth, which gives us the opportunity to make a new color, red. This color will be formed by taking the maximum amount of the red variable and no green or blue, and so we define our red variable using MakeColor(255, 0, 0).
We will also make the mouth rectangular, which will allow us to use the function c.ClearRect(). This function takes four float64 parameters; the first two correspond to the minimum x- and y-coordinates of the rectangle, and the last two correspond to the maximum x- and y-coordinates of the rectangle. We will make the rectangle 200 pixels wide and 20 pixels tall, and so the x-coordinates will range from 400 to 600, and the y-coordinates will range from 600 to 620. We do not need to call c.Fill() after calling c.ClearRect(), since this function will fill the rectangle automatically.
// DrawFace takes no inputs and returns nothing.
// It uses the canvas package to draw a face to a file
// in the output folder.
func DrawFace() {
	// create the canvas
	c := canvas.CreateNewCanvas(1000, 2000)

	// fill canvas as black
	black := canvas.MakeColor(0, 0, 0)
	c.SetFillColor(black)
	c.Clear()

	white := canvas.MakeColor(255, 255, 255)
	c.SetFillColor(white)

	// make face
	c.Circle(500, 500, 200)
	c.Fill()

	// make nose
	c.SetFillColor(black)
	c.Circle(500, 550, 10)
	c.Fill()

	// make eyes
	c.Circle(425, 475, 15)
	c.Circle(575, 475, 15)
	c.Fill()

	// make mouth
	red := canvas.MakeColor(255, 0, 0)
	c.SetFillColor(red)
	c.ClearRect(400, 600, 600, 620)

	// save the image associated with the canvas
	c.SaveToPNG("fun.png")
}
Compiling and running our code produces our final face as shown below.

Note: Feel free to continue editing our face. Add a body, some arms, or change colors however you like to get the hang of working withcanvas.go.
Now that we understand a bit more about drawing, we are ready to apply what we have learned to draw cellular automata. Please join us in the next code along to do so!