Code along video
Learning objectives
In this code along, we will ask what the most basic operations of a computer need to be, and then we will meet X-Toy, a hypothetical computer that is a simplification of a real machine. We will see how a single instruction like “add two registers” can be encoded as a string of 16 bits (or four hex digits), write and run our first X-Toy program in the Visual X-TOY simulator, read and print numbers using the special memory address FF, and watch what happens when an addition is too large to fit in a register.
Code along summary
Setup
We will run our programs in Visual X-TOY, a simulator for the X-Toy machine built at Princeton. Download it from the Visual X-TOY homepage. On macOS, download Visual X-TOY.dmg, open it, and drag the app into your Applications folder. On any other operating system (or if the Mac app gives you trouble), download toy.jar instead and run it from the folder where you saved it with the following command; this requires that you have Java installed.
java -jar toy.jar
When Visual X-TOY opens, it is in edit mode, with a template header comment already in place. We type a program one memory word per line in the form AA: WXYZ, meaning that memory address AA holds the four hex digits WXYZ. Use the File menu to save the program as a .toy file and to open it again later. We have also provided the programs from this lesson as starter files: first_program.toy, first_program_print.toy, and adding_numbers.toy.
What operations does a machine need?
Recall that our computer has a central processing unit (CPU) with a small number of registers, which are storage locations right next to the CPU, as well as a large bank of memory (RAM) with many numbered locations. If we are going to build a programming language from a handful of built-in building blocks, what should those building blocks be?
STOP: Before reading on, think about which basic operations a machine with registers and a bank of memory would need in order to do anything useful.
Calling functions or looping over lists is far too high level for us here. At the absolute foundation, we need to be able to take something in a register and put it into RAM at a particular location, and we need to be able to go to a particular location in RAM, grab what is there, and place it into one of our registers so that we can manipulate it. And when we manipulate values, anything fancy we might dream up should eventually boil down to some kind of arithmetic or logic.
Encoding an instruction as 16 bits
Perhaps the simplest instruction we could have is one that adds two registers. We can think of it a little like a function, but it is much more basic than a function: it takes the values in two registers, which we will call register s and register t, adds them, and places the result in a third register, register d. In assembly-like notation, we might write this as ADD Rd, Rs, Rt.
The remarkable idea is that we can encode this instruction itself as a sequence of bits. (The word “bit” is a portmanteau of “binary” and “digit”, so a bit is just a 0 or a 1.) In the machine that we will work with, every instruction is a string of 16 bits. The first four bits say which instruction we are performing, and the add instruction has code 0001, or 1. The next four bits give d, the register where the result goes, and the final two groups of four bits give the registers s and t that we are adding.
| instruction | d | s | t | |
|---|---|---|---|---|
| bits | 0001 | 0010 | 0010 | 1000 |
| hex | 1 | 2 | 2 | 8 |
| meaning | add | into R[2] | R[2] | R[8] |
1228 sets register 2 equal to register 2 plus register 8.If we read these 16 bits from left to right, the instruction is: add, storing the result into register 2, the values in register 2 and register 8. This is like saying “register 2 plus-equals register 8”; note that we are not adding the number 8 but rather whatever value happens to be stored in register 8. Since every group of four bits corresponds to a single hex digit, we can write this instruction much more compactly as 1228.
This is our first hint of the dark heart of computer science. The computer stores data as strings of binary digits, but it also stores the instructions that it executes as strings of binary digits.
If we can add, then we can subtract. The subtract instruction, SUB Rd, Rs, Rt, has code 0010, or 2, and otherwise uses exactly the same format: it sets register d equal to register s minus register t. So the 16 bits 0010 0010 0010 1000, or 2228 in hex, set register 2 equal to register 2 minus register 8.
Next, we need a way to set a register equal to a value, like writing x = 200 in Python. The load immediate instruction, LIMM Rd, value, has code 0111, or 7. Its next four bits give the register d, and its final eight bits give the value that we copy into register d. For example, the bits 0111 0110 1100 1000 say to set register 6 equal to 11001000, which is 200 in decimal, or C8 in hex. As a hex number, the instruction is 76C8. (From now on, we will think of numbers like this in hex, since base 10 does not connect to anything inside the computer.)
The fourth instruction, load, has code 1000, or 8. Rather than setting register d equal to a given value, it goes to the memory address given by the final eight bits and copies whatever it finds there into register d. So 8488 sets register 4 equal to whatever is stored at memory address 88, not to the number 88 itself.
The fifth instruction, store, goes in the opposite direction. It has code 1001, or 9, and it copies the value in register d into the memory address given by the final eight bits. For example, 9488 copies register 4 into memory address 88. Notice that 8488 and 9488 differ in a single bit, but that one bit changes the direction in which the data moves.
| Code | Instruction | Format | Meaning |
|---|---|---|---|
1 | add | 1dst | set R[d] to R[s] + R[t] |
2 | subtract | 2dst | set R[d] to R[s] - R[t] |
7 | load immediate | 7d + 2-digit value | set R[d] to the value |
8 | load | 8d + 2-digit address | set R[d] to the value at memory address addr |
9 | store | 9d + 2-digit address | set memory address addr to R[d] |
0 | halt | 0 + any 3 digits | stop the program |
These two instruction formats are all X-Toy ever uses: either an opcode followed by three registers d, s, and t, or an opcode followed by a register d and a two-digit hex value or address.
| Format | hex digit 1 | hex digit 2 | hex digit 3 | hex digit 4 |
|---|---|---|---|---|
| register (RR) | opcode | d | s | t |
| address (A) | opcode | d | addr (two hex digits) |
What does this little program do?
A program is just a sequence of these instructions. Here is our first one.
71C8
721E
1212
9246
STOP: Remember that 7 is load immediate, 9 is store, and 1 is add. What does each of these four instructions do, and what does the program do as a whole?
Let’s break the program down one instruction at a time. 71C8 is a load immediate that sets register 1 equal to C8. 721E sets register 2 equal to 1E. 1212 sets register 2 equal to register 1 plus register 2. And 9246 stores the value in register 2 at memory address 46.
| Hex | Assembly | Effect |
|---|---|---|
71C8 | LIMM R1, C8 | R[1] is C8 |
721E | LIMM R2, 1E | R[2] is 1E |
1212 | ADD R2, R1, R2 | R[2] is C8 + 1E = E6 |
9246 | STORE R2, 46 | memory address 46 holds E6 |
If you had used base 16 your entire life, you would say that of course C8 plus 1E is E6. In decimal, C8 is 200 and 1E is 30, and their sum is 230. In Python, this program would be something like setting one variable to 200, another to 30, adding them, and assigning the result to a third variable. Python manages all of the registers and memory locations for us behind the scenes; we never know whether a variable is sitting in a register, in memory, or both. That abstraction is a wonderful thing, because programming at the level of ones and zeros is a real pain in the neck, but it is also why it is worth stepping down a level to see how everything works. In fact, the program itself is really just a sequence of integers, each one encoding a single simple instruction.
Our first program in Visual X-TOY
Let’s type this program into Visual X-TOY. Remember from the slides that memory stores variables and numbers, but now it is also going to store our instructions. In X-Toy, a program always starts at memory address 10 (which we read as “one zero”, since it is a hex address, not ten). We will therefore place each instruction into consecutive memory addresses, starting at 10.
In edit mode, below the header comment, type 10: 71C8. As soon as we do, Visual X-TOY color-codes the instruction in blue and generates a comment next to it, R[1] <- 00C8, which describes what the instruction does; the left arrow means “set register 1 equal to”. Then add the remaining instructions at memory addresses 11, 12, and 13. Visual X-TOY fills in a comment for each one.
There is one more key point, which is that we need to end the program. X-Toy has a special register called the program counter (PC), which always starts at memory address 10. Unless we tell it otherwise, after executing each instruction the program counter moves on to the next address, 11, then 12, then 13, and so on. To make it stop, we use the halt instruction, which is any word whose first hex digit is 0. Since every memory address in X-Toy starts out equal to 0000, the machine would halt at 14 even if we did not write anything there, but we will add the halt explicitly. Note that 0FAB, or 0 followed by any three hex digits, would halt just the same.
10: 71C8   R[1] <- 00C8
11: 721E   R[2] <- 001E
12: 1212   R[2] <- R[1] + R[2]
13: 9246   M[46] <- R[2]
14: 0000   halt
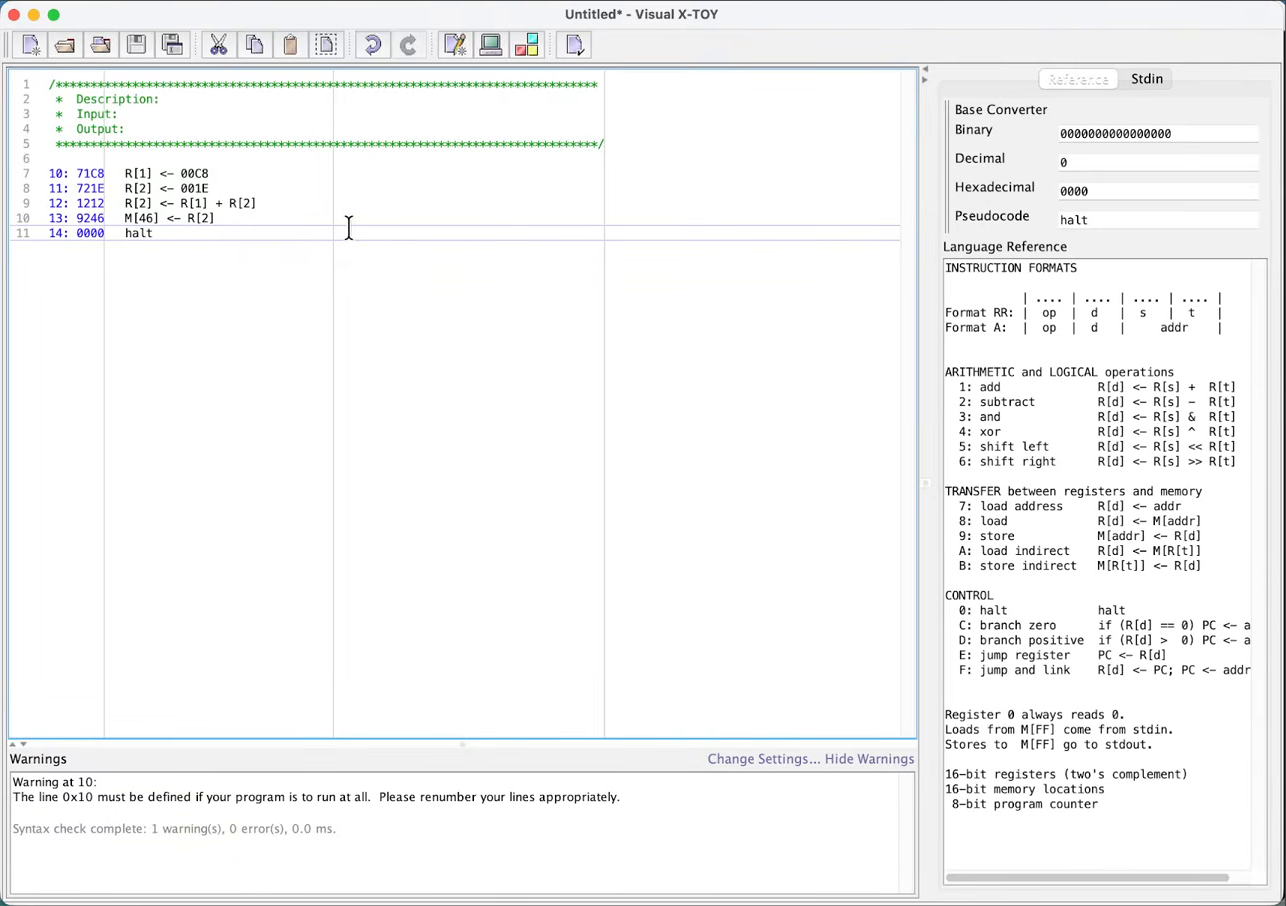
The Language Reference panel on the right of the window is a bit of a spoiler, since it lists every instruction code that X-Toy has, along with a few facts about the machine. Visual X-TOY calls instruction 7 “load address”; this is the instruction that we have been calling load immediate. The panel also tells us that X-Toy’s registers and memory locations each hold 16 bits (four hex digits), that its program counter has 8 bits (so memory addresses run from 00 to FF, giving 256 locations), and that register 0 always reads 0. In the simulator, we will see the machine’s 16 registers, named R[0] through R[F]. We will meet the remaining instructions in later lessons.
Now switch from edit mode into simulation mode using the mode buttons in the toolbar. This mode shows an old-school front panel for our hypothetical machine, along with all 16 registers and a view of the memory that we can scroll through. All memory addresses start off equal to 0000, except for the addresses where our program lives.
We could click Run to execute the whole program, but let’s click Step to execute it one instruction at a time. The first step executes 71C8 at address 10, and R[1] becomes 00C8. The next step sets R[2] to 001E. The third step executes 1212, and R[2] is updated to the sum, 00E6. Before the fourth step, take a look at memory address 46, which is currently 0000. When we step one more time, the store instruction executes, and memory address 46 is populated with 00E6. The program counter has now reached 14, which holds a halt, so the program stops. If we click Reset and then Run, the simulator executes all of these steps with a slight delay and stops when it gets to address 14.
![Visual X-TOY in simulation mode after running the first program: R[1] is 00C8, R[2] is 00E6, and memory address 46 holds 00E6](https://programmingforlovers.com/wp-content/uploads/ch7-visual-xtoy-simulation-mode.png)
R[1] holds 00C8, R[2] holds 00E6, and memory address 46 holds 00E6.There is nothing special about address 46; it was an arbitrary choice, and you could store the sum anywhere you like. We can also check the result outside of the simulator; running first_program.toy in the reference X-Toy simulator and dumping its final state shows the same registers and the same value at address 46 (here is an excerpt of that dump).
Registers:
0000 00C8 00E6 0000 0000 0000 0000 0000
0000 0000 0000 0000 0000 0000 0000 0000

Main memory, addresses 40 to 47:
0000 0000 0000 0000 0000 0000 00E6 0000
Reading and printing with address FF
Writing to a location in memory can sometimes cause something else to happen in a computer, like a disk operation or a change to the display. In X-Toy, the special reserved memory address FF represents standard input and standard output. Let’s think about standard output first: storing a register to address FF will print it.
In edit mode, change the instruction at address 13 from 9246 to 92FF. The auto-generated comment changes to write R[2], and when you see “write”, you should think “print”.
10: 71C8   R[1] <- 00C8
11: 721E   R[2] <- 001E
12: 1212   R[2] <- R[1] + R[2]
13: 92FF   write R[2]
14: 0000   halt
When we reset and step through this program in simulation mode, the final instruction makes 00E6 appear in the STDOUT display, since that is the value in register 2. (It also shows up at memory address FF.) Running first_program_print.toy prints the same value.
00E6
We can also load from address FF, which reads a value from the user. Instead of loading the values C8 and 1E with load immediate, let’s change the first two instructions to loads (code 8) from address FF: 81FF reads a value from standard input into register 1, and 82FF reads a value into register 2. We will still add the two values and print the result, so this program reads in two numbers and prints their sum.
10: 81FF   read R[1]
11: 82FF   read R[2]
12: 1212   R[2] <- R[1] + R[2]
13: 92FF   write R[2]
14: 0000   halt
Before running, we need to give the program some input. In edit mode, open the Stdin tab in the right panel, type a four-digit hex word into the box, and click Add. Let’s add 0003 and then 0005. Standard input behaves like a queue: 0003 went in first, so it will come out first, and 0005 will come out second.
When we step through the program, the first instruction reads 0003 into R[1], and the second reads 0005 into R[2], like grabbing two numbers from a user. After the addition, R[2] holds 0008, and the final instruction prints it to the console. You can think of reading from FF like the command line arguments that we passed to programs earlier in the course; it gives us a way to feed values into our program from outside. Here is the output of adding_numbers.toy when standard input contains 0003 and 0005.
0008
Integer overflow
There is one more thing to notice. Let’s remove our two input values and replace them with FFFF and 0002.
STOP: What do you think the program will print when it addsFFFFand0002?
Let’s follow the standard addition algorithm in base 16. 2 + F is 17 in decimal, which in hex is 11, so we write a 1 and carry the 1. Then each 1 + F gives 0 and carries the 1 again. The true sum is the five-digit hex number 10001.
However, when the program adds these two numbers and places the result into register 2, there isn’t enough room. Registers hold only four hex digits, so the leading 1 is truncated and thrown away. When we print the result, the program prints 0001.
0001
This is an example of integer overflow. If you have only worked with Python, overflow may not be familiar, since Python integers can grow as large as we like. But in many other programming languages, overflow is something you constantly need to keep in mind, because each variable comes with a fixed amount of storage, and in X-Toy that storage is just four hex digits. The fancy way of saying this is that arithmetic in X-Toy is done modulo 164 = 216, meaning that we keep only the remainder after dividing by 164. In hex, 10001 divided by 10000 leaves a remainder of 1. The point is that storage is finite, so when we go one or two beyond the largest number we can store, FFFF, the arithmetic wraps around in a cycle.
Looking ahead
We have now met X-Toy, encoded our first instructions as four hex digits, and written programs that store to memory, print, read input, and even overflow. So far our machine can only add and subtract. In the next lesson, we will explore X-Toy’s other arithmetic and logic instructions, which operate directly on the bits of a register.